
![ApptioCareers-Employee[1]](data:image/svg+xml;base64,PHN2ZyB4bWxucz0iaHR0cDovL3d3dy53My5vcmcvMjAwMC9zdmciIHZpZXdCb3g9IjAgMCAyMjUgMjc1IiB3aWR0aD0iMjI1IiBoZWlnaHQ9IjI3NSIgZGF0YS11PSJodHRwcyUzQSUyRiUyRnd3dy5hcHB0aW8uY29tJTJGd3AtY29udGVudCUyRnVwbG9hZHMlMkZlbGVtZW50b3IlMkZ0aHVtYnMlMkZBcHB0aW9DYXJlZXJzLUVtcGxveWVlMS1xZzVuenB5MHdoaWJtbzZvdmJqNGM3MHh0aTUzdmo1OHM0endwajh0dHMucG5nIiBkYXRhLXc9IjIyNSIgZGF0YS1oPSIyNzUiIGRhdGEtYmlwPSIiPjwvc3ZnPg== "ApptioCareers-Employee[1]")
Kubernetes Multi-Cloud
Chapter 1: Multi-Cluster
Like this article?
Subscribe to our LinkedIn newsletter to receive more educational content.
Kubernetes is designed to scale quickly, massively, and reliably. However, scaling in place — such as adding more nodes to a cluster — eventually reaches a point of diminishing returns. Kubernetes multi-cluster, which is multiple Kubernetes clusters operating as a single logical platform, helps solve this problem and enhances Kubernetes capabilities in many critical areas.
This article will explore Kubernetes multi-cluster in depth, including its benefits, implementation strategies, and how to configure Kubernetes multi-cluster.
Key benefits of Kubernetes multi-cluster
Deploying Kubernetes architecture comes with lots of decisions to make. Public cloud vs. on-premise, networking and namespace layouts, sizing, and resource allocation: an administrator has to keep all this in mind and choose effectively. Among these important design decisions is the multi-faceted question of reliability.
Although Kubernetes is designed to abstract the complexities of container orchestration, the platform’s vanilla configuration is often inadequate for maintaining complex distributed systems at a large scale. The table below summarizes how Kubernetes multi-cluster improves reliability at scale.
| Reliability goal | Value of Kubernetes multi-cluster |
|---|---|
| Service Reliability | Kubernetes multi-clustering improves the reliability of Kubernetes application services by making them resilient to the failure of individual nodes and node groups. |
| Tenant Isolation | While there are many ways to solve isolation, purpose-dedicated clusters in a multi-cluster configuration provide a strong isolation boundary and straightforward security model. |
| Geographically Distributed | In addition to improving last-mile performance and solving for certain data management requirements, geographically distributed clusters can help to mitigate risks like the loss of a data center |
| Disaster Recovery | A multi-cluster design architecture may also be used to prevent outages by adding one or more hot-spare clusters on active standby to provide support for automated failovers |
While this list is not exhaustive, it’s clear that effectively managing multiple Kubernetes clusters as a single unit has tangible benefits for your organization.
Kubernetes multi-cluster implementation strategies
There are two common implementation strategies for multi-cluster Kubernetes, mirrored and targeted.
Mirrored Kubernetes multi-cluster configuration
In a mirrored configuration, multi-cluster Kubernetes duplicates resources *n* times where *n* equals the number of clusters. For example, in a 3 cluster configuration there will be 3 identical Namespace resources, each containing 3 identical Deployment resources.
While the configuration is centrally-managed, traffic management may vary from one implementation to another. Some organizations may choose a global traffic strategy to distribute connections, while others may choose a mirrored configuration to build a hot spare cluster that is an exact copy of the live cluster. With the hot spare configuration, traffic isn’t normally routed to the spare unless there is a failure.
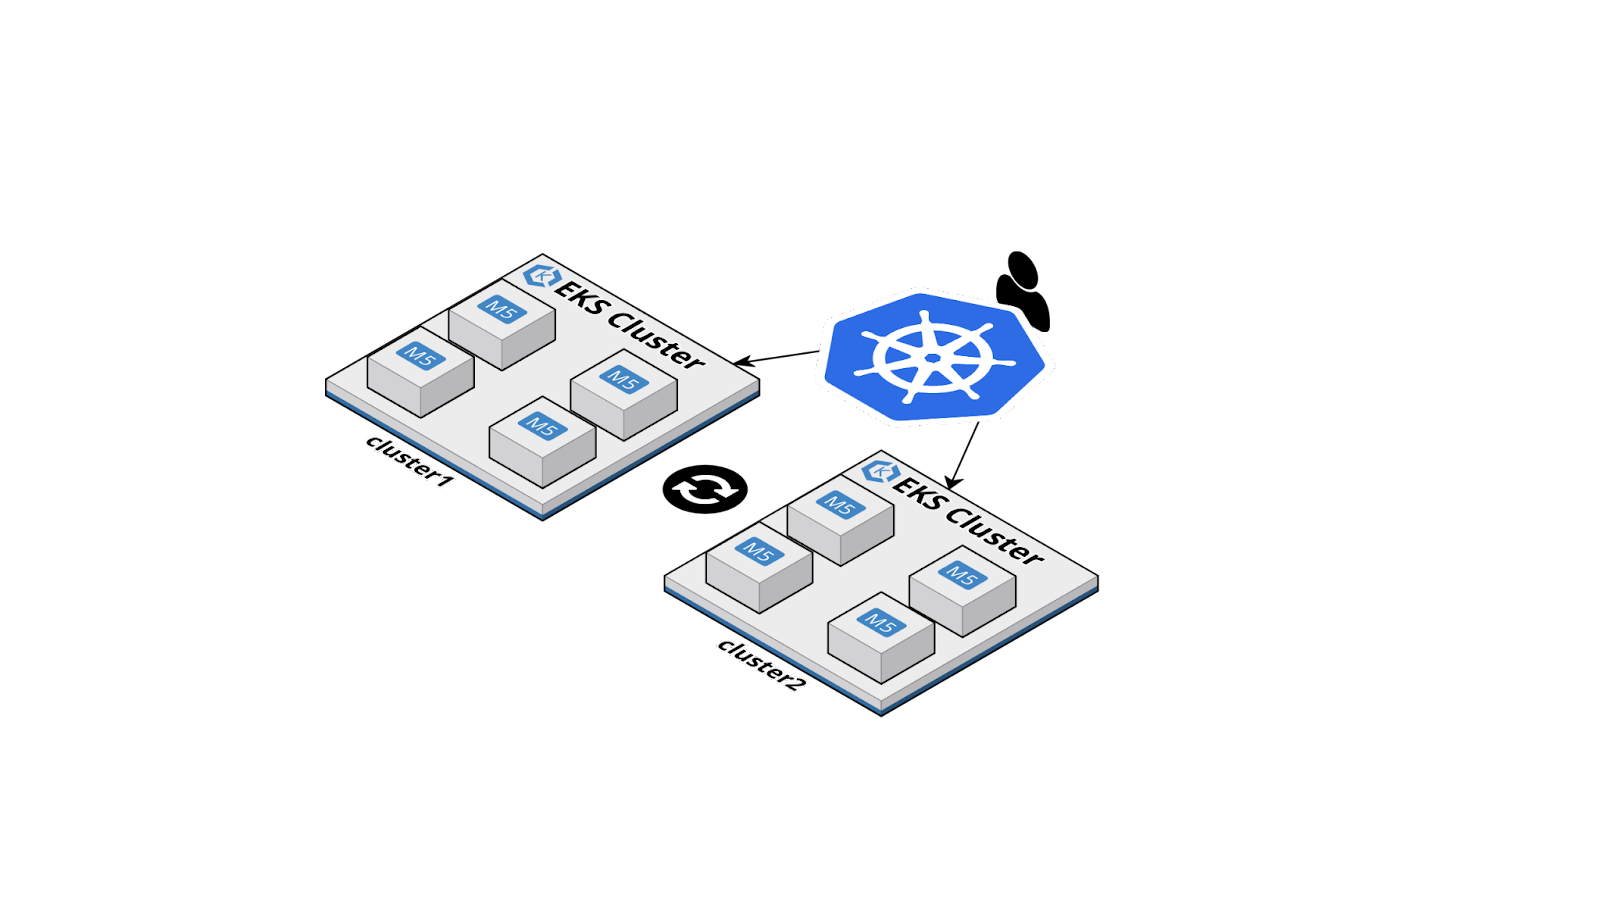
A mirrored multi-cluster Kubernetes architecture diagram might look like this:
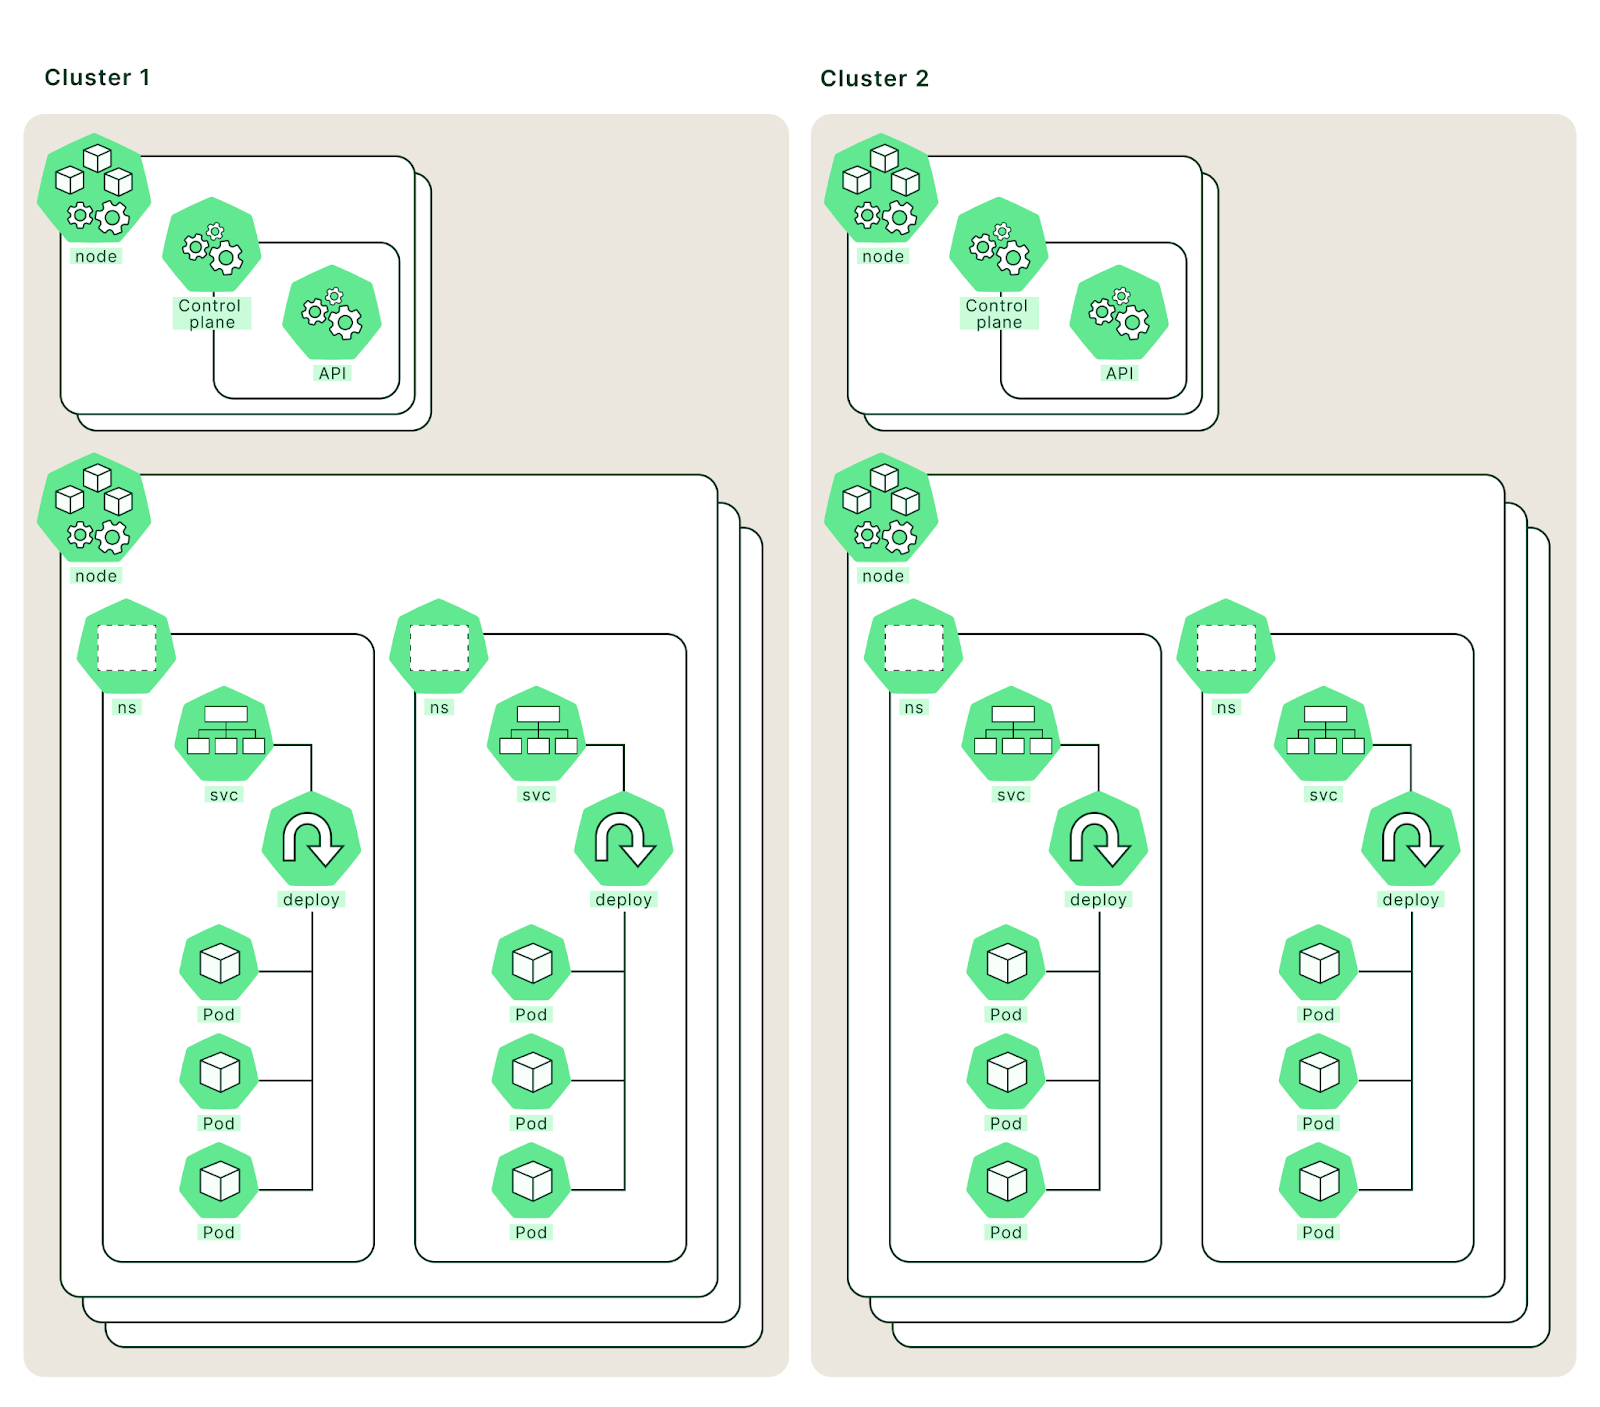
The geographical distance between clusters does not matter. They can be near one another (e.g., for tenant isolation) or far apart (e.g., for disaster recovery and geographical distribution). Regardless of the physical relationship of the clusters, the most important characteristic is that namespaces, services, deployments, and other Kubernetes resources are duplicated from cluster1 to cluster2 and kept synchronized.
Note the direction of the movement from cluster1 to cluster2. This centralizes administrative tasks on cluster1 for simplicity and ease of administration without compromising the goal of synchronizing additional clusters.
Targeted Kubernetes multi-cluster configuration
The targeted Kubernetes multi-cluster strategy closely resembles the mirrored strategy in that a single primary entry point synchronizes status updates across all secondary clusters. One important difference is that, in a targeted strategy, not all resources are in scope to be synchronized. For example, only a single Deployment or the entirety of a single Namespace might be mirrored. This is far more suitable for tenant isolation and some performance-focused architectures because it provides administrators with the flexibility and precision necessary to adapt to changing needs and situations.
For some organizations, it may also be a lower-cost option since the resource requirements are not likely to be 1:1 with the primary cluster. That is, the quantity and size of nodes does not have to be the same in each cluster. A targeted strategy may also be a good fit for organizations with complex data governance requirements, allowing administrators to remain flexible to the needs of legal and compliance teams.
Kubernetes multi-cluster solutions
Although any technology solution that can synchronize data between two clusters could theoretically implement a mirrored or targeted strategy, some are more suited to one than the other.
In the examples that follow, we will use kubefed federation to demonstrate a mirrored strategy, ArgoCD to demonstrate a targeted strategy, and Linkerd service mesh to implement a blended strategy.
| Multi-Cluster Technology | Description |
|---|---|
|
Federation (kubefed) |
In this model a primary cluster is identified that will be responsible for propagating configuration of resources out to *n* secondary clusters through a single set of APIs. Secondary clusters and all resources managed by kubefed are configured deterministically to ensure strong consistency and targeted management. |
|
GitOps (ArgoCD) (FluxCD) |
This model uses a centralized deployment engine, such as ArgoCD, configured with multiple cluster destinations such that a single application can be deployed to many clusters. The tight coupling of development tasks, such as merging a pull request, to deployment actions, such as updating an image version, has made GitOps a very popular strategy for automating responsive CI-CD operations. |
|
Service Mesh (Linkerd) (Istio) |
A service mesh model uses a process called injection to manage traffic routing, in this case across disparate clusters participating in a Kubernetes multi-cluster configuration. Kubernetes resources are managed on each cluster independently - or potentially using one of the above models - and the mesh presents a single-plane view both internally and externally through managed connection routing. |
These are not the only options for either the architecture or the software. One of the major benefits of Kubernetes is its vast ecosystem of tools and options for solving almost any need.

Kubernetes multi-cluster configuration instructions
Setup and assumptions
Deploying Kubernetes clusters is outside of this article’s scope and it is assumed that at least two clusters are available for configuration, nominally a primary and secondary cluster. The primary cluster will function as the source of truth for configuration and as a polling target for the secondary cluster to sync status.
The architecture used for all examples in this article follows this structure:
Begin by renaming cluster contexts for convenience:
					$ kubectl config rename-context <cluster1 context> cluster1
$ kubectl config rename-context <cluster2 context> cluster1
Going forward these clusters will be referred to by these aliases. However, the strings cluster1 and cluster2 are arbitrary and any names can be used. Here, cluster1 will be used as the primary and cluster2 as the secondary.
Federation with kubefed
Add the Helm repository for kubefed:
					$ helm repo add kubefed-charts https://raw.githubusercontent.com/kubernetes-sigs/kubefed/master/charts
"kubefed-charts" has been added to your repositories
Confirm the addition:
					$ helm repo list
NAME     		 URL
kubefed-charts    https://raw.githubusercontent.com/kubernetes-sigs/kubefed/master/charts
Setup the shell environment (Mac on AMD64 shown):
					$ VERSION=0.10.0
$ OS=darwin
$ ARCH=amd64
Install the kubefed chart on the primary clusters (the namespace value is arbitrary and can be substituted for any preferred string):
					$ helm \
  --namespace kube-federation-system \
  upgrade -i kubefed kubefed-charts/kubefed \
  --version=$VERSION \
  --create-namespace \
  --kube-context cluster1
Release "kubefed" does not exist. Installing it now.
NAME: kubefed
LAST DEPLOYED: Wed Oct 12 10:10:15 2022
NAMESPACE: kube-federation-system
STATUS: deployed
REVISION: 1
TEST SUITE: None
Confirm the installation:
					$ helm list --namespace kube-federation-system
NAME  	 NAMESPACE        		 REVISION    UPDATED                        		 STATUS 	 CHART    		 APP VERSION
kubefed    kube-federation-system    1  		 2022-10-12 10:10:15.127896 -0700 PDT    deployed    kubefed-0.10.0
The version string 0.10.0 matches the current stable release and should be adjusted to remain up-to-date.
Install the kubefedctl utility (Mac commands shown):
					$ curl -LO https://github.com/kubernetes-sigs/kubefed/releases/download/v${VERSION}/kubefedctl-${VERSION}-${OS}-${ARCH}.tgz
$ tar -zxf kubefedctl-0.10.0-darwin-amd64.tgz
$ chmod u+x kubefedctl
$ sudo mv kubefedctl /usr/local/bin/
Verify the install:
					$ kubefedctl version
kubefedctl version: version.Info{Version:"v0.9.2-29-g76ad91b1f", GitCommit:"76ad91b1fbdedee0c6733ccaa00d7165965b69fe", GitTreeState:"clean", BuildDate:"2022-08-10T10:03:33Z", GoVersion:"go1.16.6", Compiler:"gc", Platform:"darwin/amd64"}
Using the kubefedctl utility, federate the two clusters:
					$ kubefedctl join cluster1 \
  --cluster-context cluster1 \
  --host-cluster-context cluster1 \
  --v=2
I1012 10:38:56.201019   53204 join.go:162] Args and flags: name cluster1, host: cluster1, host-system-namespace: kube-federation-system, kubeconfig: , cluster-context: cluster1, secret-name: , dry-run: false
I1012 10:38:57.620465   53204 join.go:243] Performing preflight checks.
I1012 10:38:57.888275   53204 join.go:249] Creating kube-federation-system namespace in joining cluster
I1012 10:38:57.979304   53204 join.go:407] Already existing kube-federation-system namespace
I1012 10:38:57.979335   53204 join.go:256] Created kube-federation-system namespace in joining cluster
I1012 10:38:57.979348   53204 join.go:429] Creating service account in joining cluster: cluster1
I1012 10:38:58.076172   53204 join.go:439] Created service account: cluster1-cluster1 in joining cluster: cluster1
I1012 10:38:58.166987   53204 join.go:449] Created service account token secret: cluster1-cluster1 in joining cluster: cluster1
I1012 10:38:58.167025   53204 join.go:476] Creating cluster role and binding for service account: cluster1-cluster1 in joining cluster: cluster1
I1012 10:38:58.723498   53204 join.go:485] Created cluster role and binding for service account: cluster1-cluster1 in joining cluster: cluster1
I1012 10:38:58.723533   53204 join.go:888] Creating cluster credentials secret in host cluster
I1012 10:38:59.093922   53204 join.go:982] Created secret in host cluster named: cluster1-25l7f
I1012 10:38:59.484364   53204 join.go:301] Created federated cluster resource

$ kubefedctl join cluster2 \
  --cluster-context cluster2 \
  --host-cluster-context cluster1 \
  --v=2
I1012 10:42:15.157770   53226 join.go:162] Args and flags: name cluster2, host: cluster1, host-system-namespace: kube-federation-system, kubeconfig: , cluster-context: cluster2, secret-name: , dry-run: false
I1012 10:42:16.578734   53226 join.go:243] Performing preflight checks.
I1012 10:42:16.924855   53226 join.go:249] Creating kube-federation-system namespace in joining cluster
I1012 10:42:17.010982   53226 join.go:407] Already existing kube-federation-system namespace
I1012 10:42:17.011011   53226 join.go:256] Created kube-federation-system namespace in joining cluster
I1012 10:42:17.011024   53226 join.go:429] Creating service account in joining cluster: cluster2
I1012 10:42:17.104375   53226 join.go:439] Created service account: cluster2-cluster1 in joining cluster: cluster2
I1012 10:42:17.190758   53226 join.go:449] Created service account token secret: cluster2-cluster1 in joining cluster: cluster2
I1012 10:42:17.190777   53226 join.go:476] Creating cluster role and binding for service account: cluster2-cluster1 in joining cluster: cluster2
I1012 10:42:17.724388   53226 join.go:485] Created cluster role and binding for service account: cluster2-cluster1 in joining cluster: cluster2
I1012 10:42:17.724415   53226 join.go:888] Creating cluster credentials secret in host cluster
I1012 10:42:18.099499   53226 join.go:982] Created secret in host cluster named: cluster2-5p5r4
I1012 10:42:18.475912   53226 join.go:301] Created federated cluster resource
Using the code provided in the kubefed Git repository and test the federation:
					$ git clone https://github.com/kubernetes-sigs/kubefed.git && \
  cd kubefed && \
  kubefedctl enable ClusterRoleBinding

$ kubectl --context=cluster1 apply \
  -f example/sample1/namespace.yaml \
  -f example/sample1/federatednamespace.yaml

$ for r in configmaps secrets service deployment serviceaccount job; do
    for c in cluster1 cluster2; do
    	echo; echo ------------ ${c} resource: ${r} ------------; echo
    	kubectl --context=${c} -n test-namespace get ${r}
    	echo; echo
    done
Done
Output should be similar to:
					------------ cluster1 resource: configmaps ------------

NAME           	DATA   AGE
kube-root-ca.crt   1  	5m21s
test-configmap 	1  	53s


------------ cluster2 resource: configmaps ------------

NAME           	DATA   AGE
kube-root-ca.crt   1  	5m20s
test-configmap 	1  	53s


------------ cluster1 resource: secrets ------------

NAME                          	TYPE                              	DATA   AGE
default-token-tqf7m           	kubernetes.io/service-account-token   3  	5m22s
test-secret                   	Opaque                            	1  	52s
test-serviceaccount-token-zz9v6   kubernetes.io/service-account-token   3  	52s


------------ cluster2 resource: secrets ------------

NAME                          	TYPE                              	DATA   AGE
default-token-5tvzp           	kubernetes.io/service-account-token   3  	5m21s
test-secret                   	Opaque                            	1  	53s
test-serviceaccount-token-2gspg   kubernetes.io/service-account-token   3  	52s


------------ cluster1 resource: service ------------

NAME       	TYPE   	CLUSTER-IP   	EXTERNAL-IP   PORT(S)    	AGE
test-service   NodePort   10.100.219.142   <none>    	80:30313/TCP   52s


------------ cluster2 resource: service ------------

NAME       	TYPE   	CLUSTER-IP 	EXTERNAL-IP   PORT(S)    	AGE
test-service   NodePort   10.100.97.86   <none>    	80:30708/TCP   53s


------------ cluster1 resource: deployment ------------

NAME          	READY   UP-TO-DATE   AVAILABLE   AGE
test-deployment   3/3 	3        	3       	55s


------------ cluster2 resource: deployment ------------

NAME          	READY   UP-TO-DATE   AVAILABLE   AGE
test-deployment   5/5 	5        	5       	54s


------------ cluster1 resource: serviceaccount ------------

NAME              	SECRETS   AGE
default           	1     	5m24s
test-serviceaccount   1     	54s


------------ cluster2 resource: serviceaccount ------------

NAME              	SECRETS   AGE
default           	1     	5m23s
test-serviceaccount   1     	54s


------------ cluster1 resource: job ------------

NAME   	COMPLETIONS   DURATION   AGE
test-job   0/1       	55s    	55s


------------ cluster2 resource: job ------------

NAME   	COMPLETIONS   DURATION   AGE
test-job   0/1 of 2  	56s    	56s
While this confirms that federation has been successful, testing a failure is always a good idea – remove cluster2 from federation and re-check resources:
					$ kubectl -n test-namespace patch federatednamespace test-namespace \
  --type=merge \
  -p '{"spec": {"placement": {"clusters": [{"name": "cluster1"}]}}}'
federatednamespace.types.kubefed.io/test-namespace patched

$ for r in configmaps secrets service deployment serviceaccount job; do
	for c in cluster1 cluster2; do
    	echo; echo ------------ ${c} resource: ${r} ------------; echo
    	kubectl --context=${c} -n test-namespace get ${r}
    	echo; echo
	done
Done
Expect output similar to:
					------------ cluster1 resource: configmaps ------------

NAME           	DATA   AGE
kube-root-ca.crt   1  	11m
test-configmap 	1  	7m9s


------------ cluster2 resource: configmaps ------------

No resources found in test-namespace namespace.


------------ cluster1 resource: secrets ------------

NAME                          	TYPE                              	DATA   AGE
default-token-tqf7m           	kubernetes.io/service-account-token   3  	11m
test-secret                   	Opaque                            	1  	7m8s
test-serviceaccount-token-zz9v6   kubernetes.io/service-account-token   3  	7m8s


------------ cluster2 resource: secrets ------------

No resources found in test-namespace namespace.


------------ cluster1 resource: service ------------

NAME       	TYPE   	CLUSTER-IP   	EXTERNAL-IP   PORT(S)    	AGE
test-service   NodePort   10.100.219.142   <none>    	80:30313/TCP   7m8s


------------ cluster2 resource: service ------------

No resources found in test-namespace namespace.


------------ cluster1 resource: deployment ------------

NAME          	READY   UP-TO-DATE   AVAILABLE   AGE
test-deployment   3/3 	3        	3       	7m11s


------------ cluster2 resource: deployment ------------

No resources found in test-namespace namespace.


------------ cluster1 resource: serviceaccount ------------

NAME              	SECRETS   AGE
default           	1     	11m
test-serviceaccount   1     	7m10s


------------ cluster2 resource: serviceaccount ------------

No resources found in test-namespace namespace.


------------ cluster1 resource: job ------------

NAME   	COMPLETIONS   DURATION   AGE
test-job   0/1       	7m12s  	7m12s


------------ cluster2 resource: job ------------

No resources found in test-namespace namespace.
The cluster can be re-added via the same patch method:
					$ kubectl -n test-namespace patch federatednamespace test-namespace \
  --type=merge \
  -p '{"spec": {"placement": {"clusters": [{"name": "cluster1"}, {"name": "cluster2"}]}}}'
federatednamespace.types.kubefed.io/test-namespace patched
Cleanup is always important, so don’t forget to delete the namespace:
$ kubectl --context=cluster1 delete ns test-namespace
What’s next?
Aside from perhaps setting up some status monitoring to ensure that resources remain synchronized, there’s not much more to this setup. Kubefed keeps resources 1:1 across the mirrored clusters. Other tools such as ArgoCD (below) or Kyverno can be added to enhance the management of the cluster, but these are outside of the scope of the multi-cluster configuration itself and would be applicable to any Kubernetes cluster.
GitOps using ArgoCD
Now, let’s explore how to use ArgoCD for GitOps to improve Kubernetes administration.
What is ArgoCD?
Unlike federation or service mesh, ArgoCD targets the continuous delivery component of Kubernetes administration. This strategy centralizes the management of Kubernetes resources but leaves each cluster free to manage resource access, such as through connection routing. ArgoCD also is not mutually exclusive with federation or service mesh and can be used to manage those configurations internally.
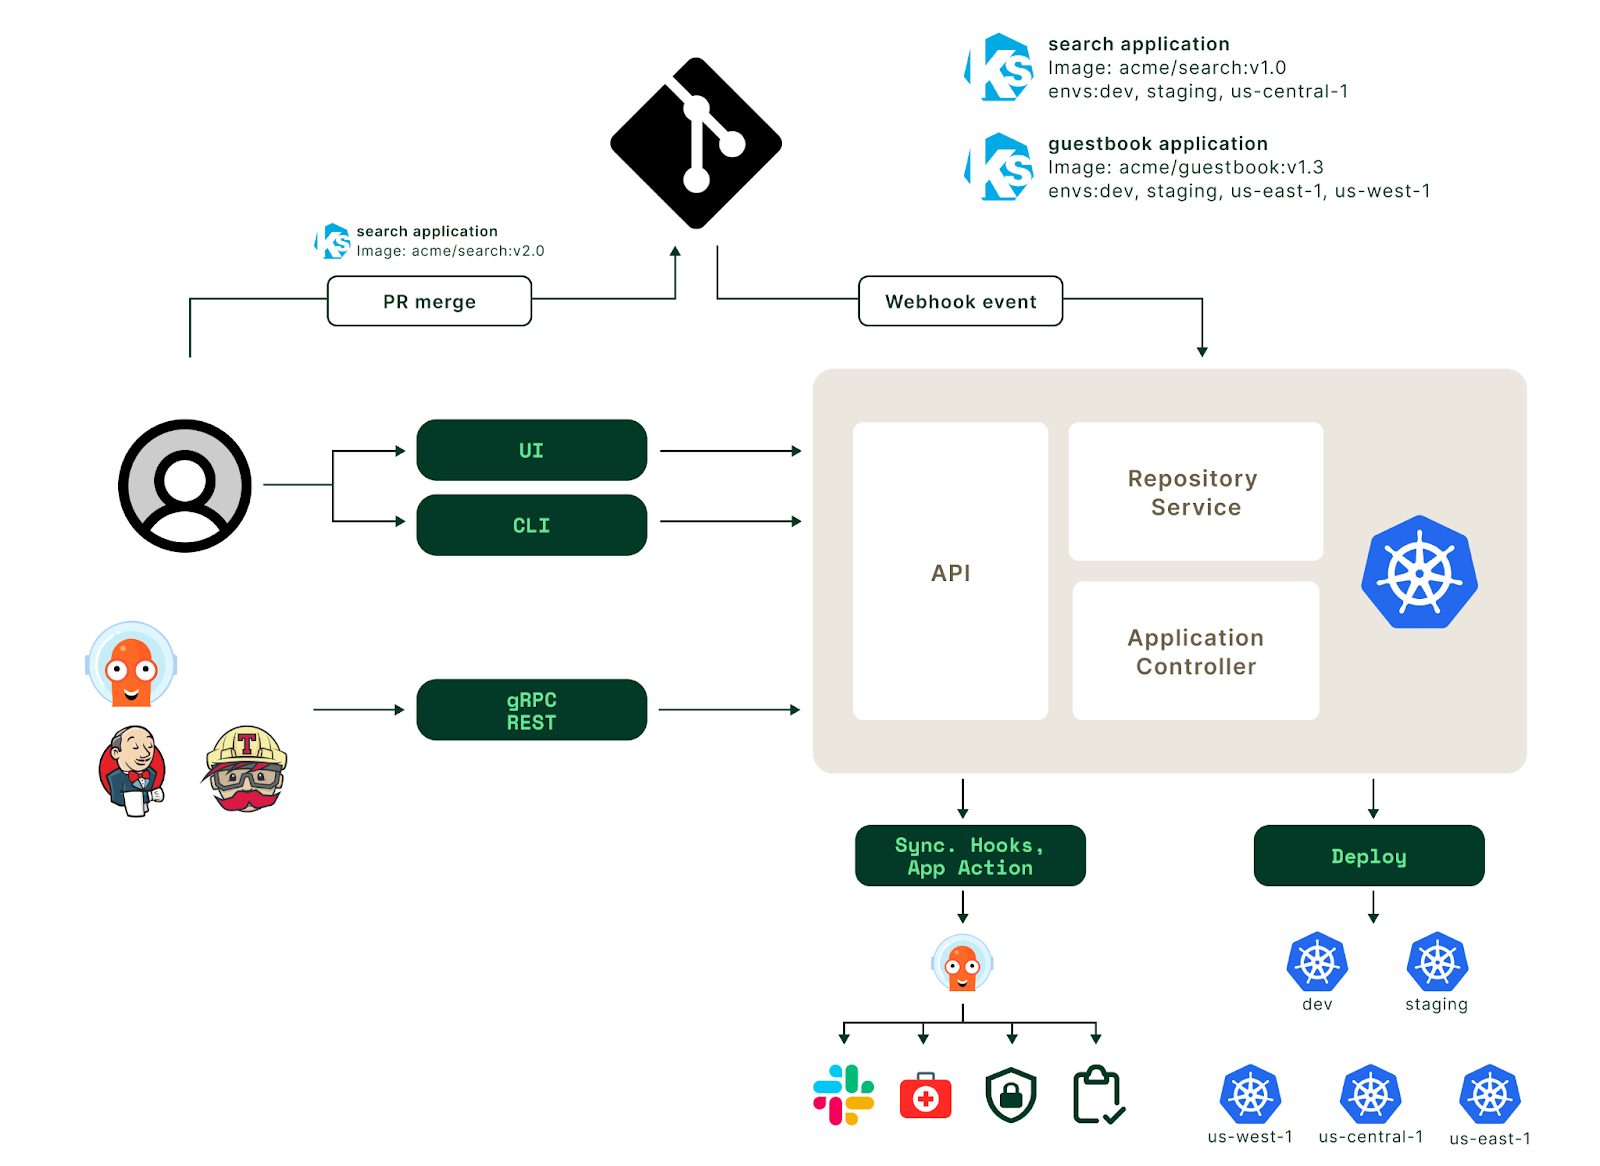
ArgoCD will monitor one or more code repositories for changes, monitor Kubernetes resources for their current state, and rationalize the two to enforce consistency based on deterministic configuration. ArgoCD’s architecture diagram visualizes this workflow:
Installing the ArgoCD Manifest
To begin, install the ArgoCD manifest using the code below:
					$ kubectl create namespace argocd
$ kubectl apply \
  -n argocd \
  -f https://raw.githubusercontent.com/argoproj/argo-cd/stable/manifests/install.yaml
customresourcedefinition.apiextensions.k8s.io/applications.argoproj.io created
customresourcedefinition.apiextensions.k8s.io/applicationsets.argoproj.io created
customresourcedefinition.apiextensions.k8s.io/appprojects.argoproj.io created
serviceaccount/argocd-application-controller created
serviceaccount/argocd-applicationset-controller created
serviceaccount/argocd-dex-server created
serviceaccount/argocd-notifications-controller created
serviceaccount/argocd-redis created
serviceaccount/argocd-repo-server created
serviceaccount/argocd-server created
role.rbac.authorization.k8s.io/argocd-application-controller created
role.rbac.authorization.k8s.io/argocd-applicationset-controller created
role.rbac.authorization.k8s.io/argocd-dex-server created
role.rbac.authorization.k8s.io/argocd-notifications-controller created
role.rbac.authorization.k8s.io/argocd-server created
clusterrole.rbac.authorization.k8s.io/argocd-application-controller created
clusterrole.rbac.authorization.k8s.io/argocd-server created
rolebinding.rbac.authorization.k8s.io/argocd-application-controller created
rolebinding.rbac.authorization.k8s.io/argocd-applicationset-controller created
rolebinding.rbac.authorization.k8s.io/argocd-dex-server created
rolebinding.rbac.authorization.k8s.io/argocd-notifications-controller created
rolebinding.rbac.authorization.k8s.io/argocd-redis created
rolebinding.rbac.authorization.k8s.io/argocd-server created
clusterrolebinding.rbac.authorization.k8s.io/argocd-application-controller created
clusterrolebinding.rbac.authorization.k8s.io/argocd-server created
configmap/argocd-cm created
configmap/argocd-cmd-params-cm created
configmap/argocd-gpg-keys-cm created
configmap/argocd-notifications-cm created
configmap/argocd-rbac-cm created
configmap/argocd-ssh-known-hosts-cm created
configmap/argocd-tls-certs-cm created
secret/argocd-notifications-secret created
secret/argocd-secret created
service/argocd-applicationset-controller created
service/argocd-dex-server created
service/argocd-metrics created
service/argocd-notifications-controller-metrics created
service/argocd-redis created
service/argocd-repo-server created
service/argocd-server created
service/argocd-server-metrics created
deployment.apps/argocd-applicationset-controller created
deployment.apps/argocd-dex-server created
deployment.apps/argocd-notifications-controller created
deployment.apps/argocd-redis created
deployment.apps/argocd-repo-server created
deployment.apps/argocd-server created
statefulset.apps/argocd-application-controller created
networkpolicy.networking.k8s.io/argocd-application-controller-network-policy created
networkpolicy.networking.k8s.io/argocd-dex-server-network-policy created
networkpolicy.networking.k8s.io/argocd-redis-network-policy created
networkpolicy.networking.k8s.io/argocd-repo-server-network-policy created
networkpolicy.networking.k8s.io/argocd-server-network-policy created
Although the namespace string is arbitrary and any namespace name can be used, the manifest will need to be manually downloaded and modified to accommodate other strings.
Also, ArgoCD offers a high-availability configuration that is outside this document’s scope but may be suitable for some workloads.
Access ArgoCD Server
Retrieve the credentials for the admin account:
$ kubectl -n argocd get secret argocd-initial-admin-secret -o jsonpath="{.data.password}" | base64 -d; echo
After capturing the secret value, it is best to delete the secret and plan to rotate the credentials on first login; this can also be performed via argocd cli.
Depending on the security posture of the primary cluster the best option for accessing the ArgoCD server may vary, including:
Expose the service as a load balancer:
$ kubectl patch svc argocd-server \
  -n argocd \
  -p '{"spec": {"type": "LoadBalancer"}}'
Port forward to the service:
$ kubectl port-forward svc/argocd-server \
  -n argocd 8443:443
Login to the web interface using the admin credentials above:
Configuring the Primary Cluster
Although the login screen is the Applications dashboard, the first operation during setup is to configure a cluster by accessing https://<argocd url>:<argocd port>/settings/clusters. By default, ArgoCD configures the local cluster where it has been installed, namedin-cluster:

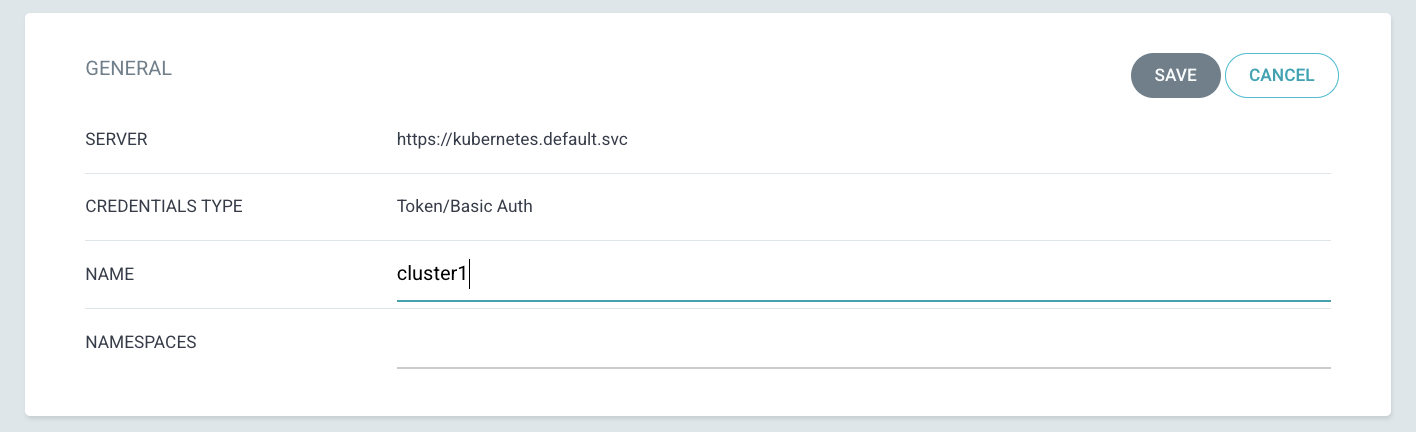
Edit the cluster name to match the context set earlier – cluster1:
The clusters list reflects the change:

Add the Secondary Cluster
Using the argocd CLI, login to the primary cluster (port forwarding from localhost shown):
					$ argocd login localhost:8443
Username: admin
Password:
'admin:login' logged in successfully
Context 'localhost:8443' updated
Using the CLI again, add the secondary cluster:
					$ argocd cluster add cluster2 --name cluster2 --yes
INFO[0006] ServiceAccount "argocd-manager" created in namespace "kube-system"
INFO[0006] ClusterRole "argocd-manager-role" created
INFO[0006] ClusterRoleBinding "argocd-manager-role-binding" created
Cluster 'https://<secondary cluster url>' added
The cluster list also reflects the change:

Adding an application
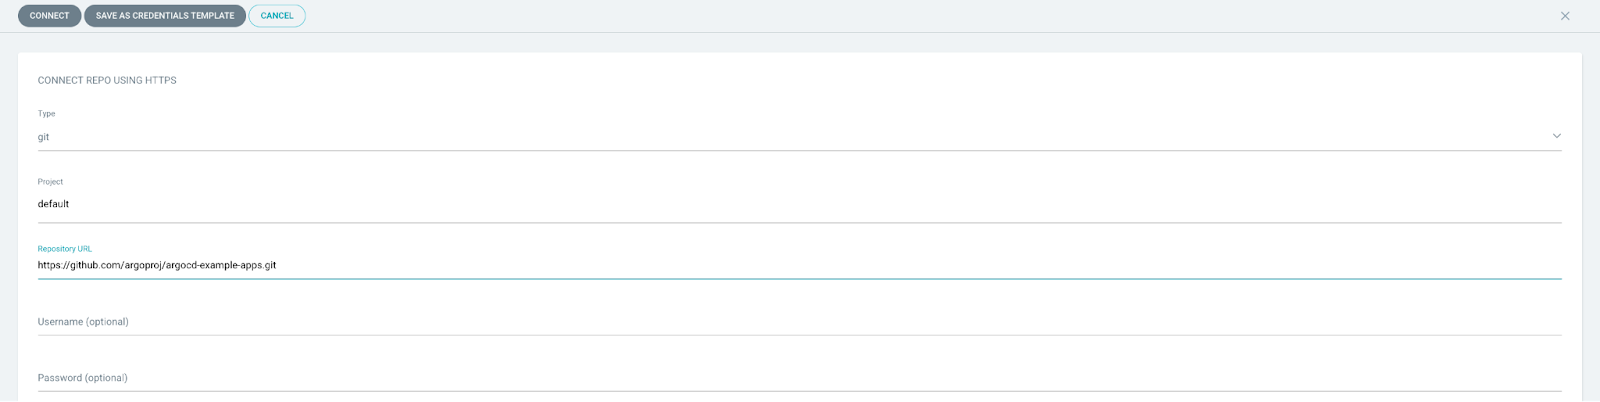
The ArgoCD project provides a public repository that can be used for creating an application for testing at https://localhost:8443/settings/repositories:
Create an ApplicationSet that will cascade into Application objects based on the code in the guestbook repository:
					---
apiVersion: argoproj.io/v1alpha1
kind: ApplicationSet
metadata:
  name: guestbook
  namespace: argocd
spec:
  generators:
  - clusters: {}
  template:
    metadata:
      name: '{{name}}-guestbook'
    spec:
      project: default
      source:
        repoURL: https://github.com/argoproj/argocd-example-apps.git
        targetRevision: HEAD
        path: guestbook
      syncPolicy:
        automated: {}
      destination:
        server: '{{server}}'
        namespace: default
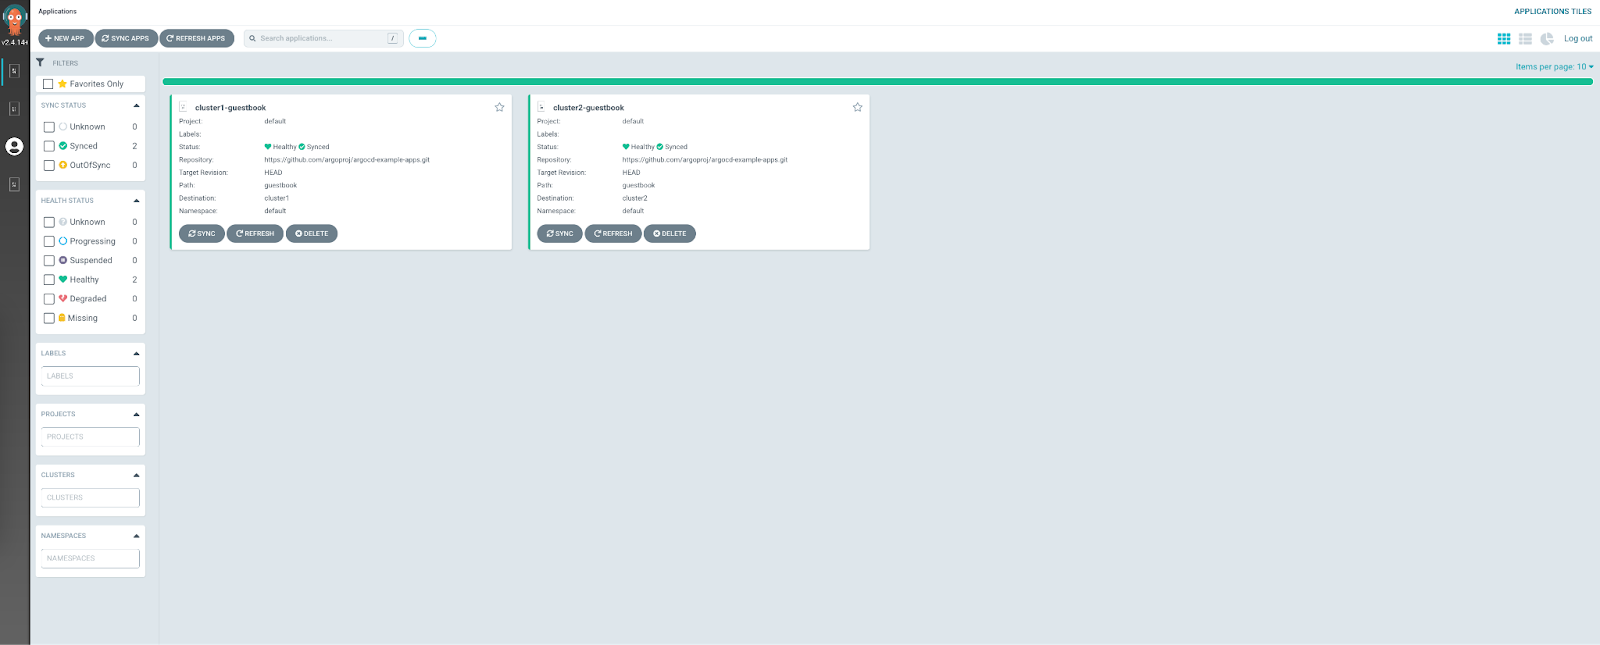
Observe the Application objects in the dashboard (https://localhost:8443/applications), one per cluster:
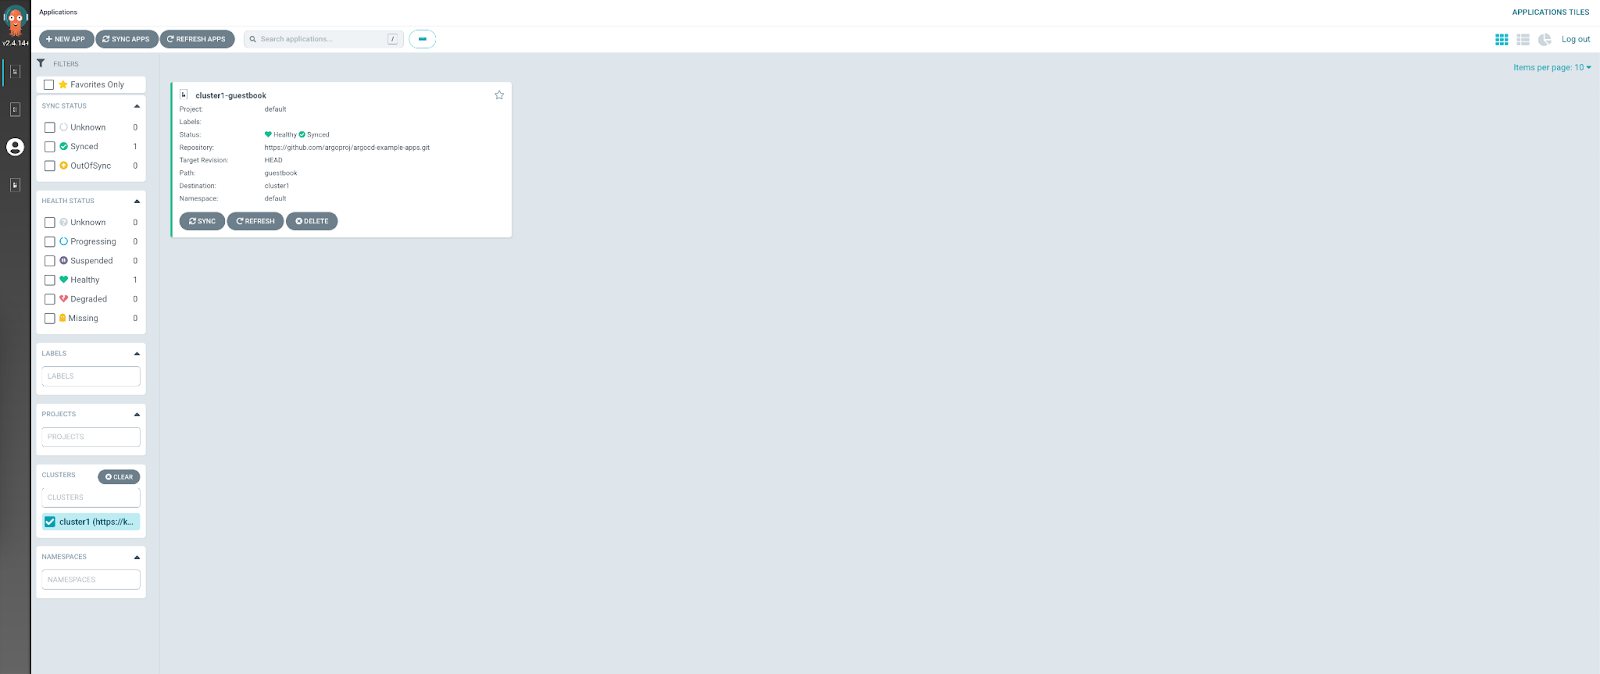
The dashboard can also be filtered to show only a specific cluster:
Using an automated syncPolicy setting may not be appropriate for all workloads and is used here only for illustrative purposes. It is not a requirement of ApplicationSets nor ArgoCD multi-cluster.
The ApplicationSet defined by the manifest will deploy to all configured clusters, controlled by the generators configuration (documentation here).
Descend into the Application Details Tree by selecting one of the application cards:
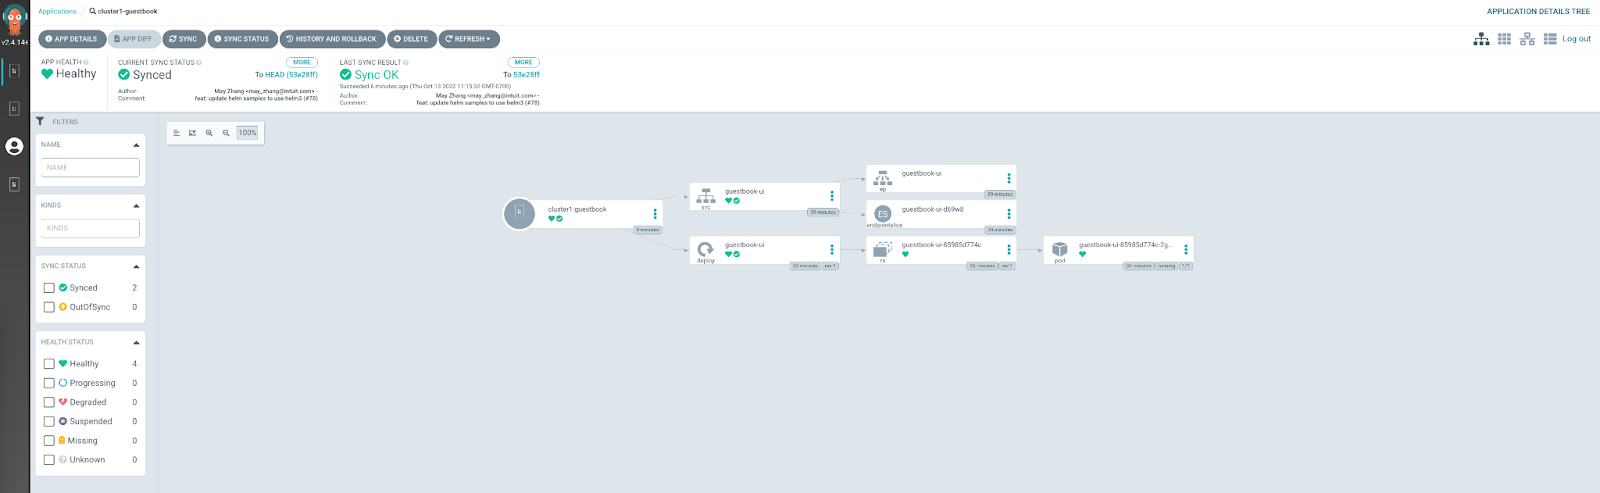
Validate these resources directly on the cluster:
					$ kubectl \
  --context cluster1 \
  --namespace default \
  get svc,deploy,pod

NAME               	TYPE    	CLUSTER-IP 	EXTERNAL-IP   PORT(S)   AGE
service/guestbook-ui   ClusterIP   10.100.13.45       	80/TCP	39m
service/kubernetes 	ClusterIP   10.100.0.1 	    	443/TCP   104m

NAME                       	READY   UP-TO-DATE   AVAILABLE   AGE
deployment.apps/guestbook-ui   1/1 	1        	1       	39m

NAME                            	READY   STATUS	RESTARTS   AGE
pod/guestbook-ui-85985d774c-2g48w   1/1 	Running   0      	39m
What’s next?
From here, the ArgoCD implementation will need a wide variety of configuration and definition inputs like limiting ArgoCD actions to one or a few specific Namespace scopes. There is also full support for implementing a least-privilege security model tied to external entities for authentication.
ArgoCD can manage practically any Kubernetes resource or Custom Resource Definition (CRD). The model may be reused as long as the paradigm is a good fit, ArgoCD will only have knowledge of resources for which it is specifically configured.
Service mesh (Linkerd)
Service mesh is already a familiar concept for adding a layer of security, observability, and reliability to existing Kubernetes capabilities. Extending a service mesh from providing these capabilities on a single cluster to performing the same feat across disparate clusters in a multi-cluster configuration is a natural evolution.
In addition to the example below, a multi-cloud/multi-cluster implementation of Linkerd can be found here.
Setup
Install Linkerd command-line utility:
$ curl --proto '=https' --tlsv1.2 -sSfL https://run.linkerd.io/install | sh
Generate pre-trusted certificates:
					$ step-cli certificate create identity.linkerd.cluster.local issuer.crt issuer.key \
  --profile intermediate-ca \
  --not-after 8760h \
  --no-password \
  --insecure \
  --ca ca.crt \
  --ca-key ca.key
Installing
Install Kubernetes CRDs:
					$ linkerd install --crds \
  | tee \
	(kubectl --context=cluster1 apply -f -) \
	(kubectl --context=cluster2 apply -f -)
Establish trust for the generated certificates:
					$ linkerd install \
  --identity-trust-anchors-file root.crt \
  --identity-issuer-certificate-file issuer.crt \
  --identity-issuer-key-file issuer.key \
  --set proxyInit.runAsRoot=true \
  | tee \
	(kubectl --context=cluster1 apply -f -) \
	(kubectl --context=cluster2 apply -f -)
Install Linkerd:
					$ for ctx in cluster1 cluster2; do
  echo "Installing on cluster: ${ctx} ........."
  linkerd --context=${ctx} install | kubectl --context=${ctx} apply -f - || break
  echo "-------------"
done
Install multi-cluster support:
					$ for ctx in cluster1 cluster2; do
  echo "Installing multicluster on cluster: ${ctx} ........."
  linkerd --context=${ctx} multicluster install | kubectl --context=${ctx} apply -f - || break
  echo "-------------”
done
Verify that the mesh has successfully installed:
					$ for ctx in cluster1 cluster2; do
  echo "Checking cluster: ${ctx} ........."
  linkerd --context=${ctx} check || break
  echo "-------------"
done
Expect output similar to:
					Checking cluster: cluster1 .........
Linkerd core checks
===================

kubernetes-api
--------------
√ can initialize the client
√ can query the Kubernetes API

kubernetes-version
------------------
√ is running the minimum Kubernetes API version
√ is running the minimum kubectl version

linkerd-existence
-----------------
√ 'linkerd-config' config map exists
√ heartbeat ServiceAccount exist
√ control plane replica sets are ready
√ no unschedulable pods
√ control plane pods are ready
√ cluster networks contains all pods

linkerd-config
--------------
√ control plane Namespace exists
√ control plane ClusterRoles exist
√ control plane ClusterRoleBindings exist
√ control plane ServiceAccounts exist
√ control plane CustomResourceDefinitions exist
√ control plane MutatingWebhookConfigurations exist
√ control plane ValidatingWebhookConfigurations exist
√ proxy-init container runs as root user if docker container runtime is used

linkerd-identity
----------------
√ certificate config is valid
√ trust anchors are using supported crypto algorithm
√ trust anchors are within their validity period
√ trust anchors are valid for at least 60 days
√ issuer cert is using supported crypto algorithm
√ issuer cert is within its validity period
√ issuer cert is valid for at least 60 days
√ issuer cert is issued by the trust anchor

linkerd-webhooks-and-apisvc-tls
-------------------------------
√ proxy-injector webhook has valid cert
√ proxy-injector cert is valid for at least 60 days
√ sp-validator webhook has valid cert
√ sp-validator cert is valid for at least 60 days
√ policy-validator webhook has valid cert
√ policy-validator cert is valid for at least 60 days

linkerd-version
---------------
√ can determine the latest version
√ cli is up-to-date

control-plane-version
---------------------
√ can retrieve the control plane version
√ control plane is up-to-date
√ control plane and cli versions match

linkerd-control-plane-proxy
---------------------------
√ control plane proxies are healthy
√ control plane proxies are up-to-date
√ control plane proxies and cli versions match

Linkerd extensions checks
=========================

linkerd-multicluster
--------------------
√ Link CRD exists
√ multicluster extension proxies are healthy
√ multicluster extension proxies are up-to-date
√ multicluster extension proxies and cli versions match

Status check results are √
Verify multi-cluster connectivity:
					$ for ctx in cluster1 cluster2; do
  echo "Checking gateway on cluster: ${ctx} ........."
  kubectl --context=${ctx} -n linkerd-multicluster rollout status deploy/linkerd-gateway || break
  echo "-------------"
done
Expect output similar to:
					Checking gateway on cluster: cluster1 .........
deployment "linkerd-gateway" successfully rolled out
-------------
Checking gateway on cluster: cluster2 .........
deployment "linkerd-gateway" successfully rolled out
-------------
Configure multi-cluster
At this point, either cluster could be made “primary”. However, from this point forward, it will be very important to remember which alias is which. cluster1 hosts services locally. cluster2 hosts services locally and links to services hosted on cluster1.
To configure the relationship described above, execute this command:
$ linkerd --context cluster1 multicluster link --cluster-name cluster2 | kubectl --context=cluster2 apply -f -
Verify the configuration:
					$ for ctx in cluster1 cluster2; do
  linkerd --context=${ctx} multicluster check || break
done
Expect output similar to:
					linkerd-multicluster
--------------------
√ Link CRD exists
√ Link resources are valid
	* cluster2
√ remote cluster access credentials are valid
	* cluster2
√ clusters share trust anchors
	* cluster2
√ service mirror controller has required permissions
	* cluster2
√ service mirror controllers are running
	* cluster2
√ all gateway mirrors are healthy
	* cluster2
√ all mirror services have endpoints
√ all mirror services are part of a Link
√ multicluster extension proxies are healthy
√ multicluster extension proxies are up-to-date
√ multicluster extension proxies and cli versions match

Status check results are √


linkerd-multicluster
--------------------
√ Link CRD exists
√ multicluster extension proxies are healthy
√ multicluster extension proxies are up-to-date
√ multicluster extension proxies and cli versions match

Status check results are √
What’s next?
At this point, services can be injected on cluster1 and will be mirrored to cluster2 across the Linkerd service mesh. This behavior is very similar to kubefed above, with a similar single-point of management, but adds support for service mesh capabilities such as mutual transport layer security (mTLS) and traffic routing. To continue enhancing this architecture, Linkerd supports various failover and routing capabilities designed for multi-cluster environments.
Because resources can be targeted directly by Linkerd injection – or as a grouped resource such as namespace – this approach implements multi-cluster in much the same fashion as the targeted strategy with ArgoCD above. By expanding Linkerd injection to many namespaces, this multi-cluster solution begins to resemble the mirrored approach with kubefed.
Conclusion
There is not a single best way to implement a Kubernetes multi-cluster architecture with so many options. Organizations implementing multi-cluster may benefit from a bottom-up approach starting with technology, such as if a specific framework (like ArgoCD or Linkerd) is already in use. Other organizations starting fresh and going straight to a multi-cluster environment may instead benefit from a top-down view by choosing a strategy and then applying technological solutions as a part of the implementation.
For many needs, Kubernetes multi-cluster provides a wide range of opportunities to strategically target various business and technical requirements to pursue cost-effective, secure, and reliable platforms.
