
![ApptioCareers-Employee[1]](data:image/svg+xml;base64,PHN2ZyB4bWxucz0iaHR0cDovL3d3dy53My5vcmcvMjAwMC9zdmciIHZpZXdCb3g9IjAgMCAyMjUgMjc1IiB3aWR0aD0iMjI1IiBoZWlnaHQ9IjI3NSIgZGF0YS11PSJodHRwcyUzQSUyRiUyRnd3dy5hcHB0aW8uY29tJTJGd3AtY29udGVudCUyRnVwbG9hZHMlMkZlbGVtZW50b3IlMkZ0aHVtYnMlMkZBcHB0aW9DYXJlZXJzLUVtcGxveWVlMS1xZzVuenB5MHdoaWJtbzZvdmJqNGM3MHh0aTUzdmo1OHM0endwajh0dHMucG5nIiBkYXRhLXc9IjIyNSIgZGF0YS1oPSIyNzUiIGRhdGEtYmlwPSIiPjwvc3ZnPg== "ApptioCareers-Employee[1]")
Kubernetes Multi-Cloud
Chapter 6: External DNS
Like this article?
Subscribe to our LinkedIn newsletter to receive more educational content.
Kubernetes is an open-source platform for automating containerised applications’ deployment, scaling, and management. It provides a unified way to manage and orchestrate containers across multiple hosts. Pods are the fundamental unit of Kubernetes, where you deploy the application. Kubernetes uses the term services to describe an abstraction that provides network access to pods.
Kubernetes uses Domain Name System(DNS) to allow pods and services to find and communicate with each other using hostnames. When a Kubernetes service is created, Kubernetes automatically creates a DNS record for the service, which other pods can use to discover and connect to the service. Additionally, Kubernetes provides built-in support for ExternalDNS, which allows the automatic creation and management of DNS records for Kubernetes services that are exposed externally. This makes it easier for external clients to access the services inside the cluster.
Summary of key Kubernetes DNS concepts
Several types of DNS (Internal and External) are compatible with Kubernetes. Ultimately the choice of DNS solution depends on the specific requirements and constraints of the organisation, but CoreDNS and External DNS are the most common and widely adopted.
| DNS name | Description |
|---|---|
| CoreDNS | This is a DNS server explicitly built for Kubernetes and is now the default DNS server in Kubernetes 1.14 and later. CoreDNS is a flexible, extensible DNS server that can perform service discovery and name resolution within the cluster, and with some configuration changes, it can leverage external DNS providers. |
| kube-dns | This is the default DNS server in Kubernetes versions before 1.14. It is a simple DNS server built into the Kubernetes control plane. It is responsible for service discovery within the cluster. |
| External DNS | This system allows for automatically creating and managing DNS records for services exposed externally with the supported DNS providers. It enables external clients to access the services running inside the cluster by resolving the service's hostname to the external IP address of the Kubernetes cluster. |
| Nginx ingress controller | This is a popular load balancer for Kubernetes that can act as a reverse proxy and distribute incoming traffic evenly to your clusters. It can also handle DNS resolution for services exposed externally. |
| Federated DNS | This allows you to use your existing DNS infrastructure (e.g. your company's DNS servers) to resolve the service names of your Kubernetes cluster without having to set up and maintain a separate DNS infrastructure. |

Why External DNS?
The Kubernetes DNS system, also known as Kube-DNS or CoreDNS, is responsible for resolving DNS names for Kubernetes services and pods within a cluster. However, organizations prefer to use an external DNS system for several reasons.
More advanced features
External DNS systems typically offer more advanced features such as global load balancing, automatic failover, and DNS-based traffic management. They also include built-in security features, such as DNSSEC, to help protect against tampering and spoofing attacks. These features are important for organizations that manage traffic across multiple regions, handle high traffic loads, or manage sensitive data.
Consistent DNS infrastructure
An external DNS system allows organizations to use a consistent DNS infrastructure across all of their applications, whether running on Kubernetes or not. In such cases, external DNS simplifies management and improves security.
Granular control
External DNS provides granular and dynamic control over DNS records or the text instructions you store on DNS servers. This is because it mainly acts as a bridge so you can configure specialised DNS providers outside of Kubernetes. External DNS can handle millions of DNS records and offer more options to manage them.
Scalability
As the number of services and pods within a Kubernetes cluster increases, the Kube-DNS system can become a bottleneck. An external DNS system can handle a much larger number of DNS queries, ensuring that the DNS system does not become a bottleneck for the rest of the cluster.
Flexibility
Using External DNS with Kubernetes provides greater flexibility regarding the type of DNS server you can use. Depending on your requirements and preferences, you can choose from various open-source DNS like CoreDNS, SkyDNS or Knot DNS and commercial DNS solutions, such as Google Cloud DNS, Amazon Route 53, BIND, or Microsoft DNS.
Using an external DNS system with Kubernetes provides organizations with more advanced DNS infrastructure and management. It is a good practice to use an external DNS when deploying Kubernetes in production. Several popular external DNS providers can work with Kubernetes. Next, let’s look at some popular options.
Public cloud DNS options you can consider
The top three public cloud providers all have external DNS products you can use. The choice of which DNS you should use depends on a couple of factors as listed below
- Primary Cloud: Which cloud you select as your organisation’s primary cloud will dictate your DNS provider’s choice. For example, If you use Azure as your primary cloud and AWS and Google as part of your multi-cloud strategy, Azure DNS could be your DNS provider for all three clouds.
- Architecture: Based on your technical architecture and requirements, you can use one or a combination of cloud DNS.
Amazon Route 53
Amazon Route 53 is a highly available and scalable cloud DNS service provided by Amazon Web Services (AWS). Route 53 can route traffic to your Kubernetes services based on geographic location, network conditions, and service availability. You can define your services and ingresses in Kubernetes and have ExternalDNS automatically create and update the corresponding DNS records in Route 53.
Google Cloud DNS
Google Cloud DNS is a highly available and scalable cloud DNS service that Google Cloud Platform provides. You can integrate it with Kubernetes to manage DNS records for Kubernetes services automatically.
Azure DNS
Azure DNS is a managed DNS service offered by Microsoft Azure. It provides a reliable and secure platform for hosting your domain names and managing their DNS records. It can automatically create and manage standard DNS record types such as A, MX, CNAME, and many others. It also provides built-in security features such as DNSSEC to help protect your domains from tampering and spoofing attacks. Azure DNS is highly scalable and globally available, allowing you to serve users from anywhere in the world with low latency. Azure DNS has the capability to integrate with Kubernetes to manage DNS records.
Third-party external DNS options
Apart from public cloud providers, there are different third parties who also offer external DNS services for Kubernetes.
Cloudflare
Cloudflare is a global provider of content delivery network (CDN) services, DDoS protection, and internet security. They offer Kubernetes integration so you can use the Cloudflare DNS service as the DNS for your Kubernetes cluster. Benefits for your cluster’s internal services include
- improved performance and reliability
- additional security features, such as DDoS protection and firewall
- Reliable customer service for troubleshooting
Akamai
Akamai is another content delivery network (CDN) provider that offers a DNS service called Akamai Intelligent Platform. This service can be integrated with Kubernetes to provide global load balancing and traffic management for services running in a Kubernetes cluster. Additionally, Akamai’s DNS service provides external access to services running in a Kubernetes cluster by mapping hostnames to the IP addresses of the cluster’s external load balancer. This can help improve your services’ performance, reliability, and security.
Infoblox
Infoblox is a provider of network services and solutions, which includes a DNS service called Infoblox DNS. You can integrate it with Kubernetes to provide:
- Service discovery and external access to services running in a Kubernetes cluster.
- Security features such as DNSSEC, which help protect against DNS-based attacks.
- Advanced traffic management capabilities, such as global load balancing and traffic steering.
Other third parties
Some smaller third-party services are also available for External DNS integration. A complete list of support DNS providers is available here.
- DigitalOcean is a popular cloud hosting provider that also provides a DNS service.
- DNSimple is an easy-to-use DNS service
- OpenDNS is an open-source solution with features like security and filtering.
- Dyn DNS service provides additional features such as load balancing and failover.
Limitations of External DNS
Additional complexity
Using External DNS with Kubernetes requires setting up and configuring the external DNS server, which adds further complexity to your infrastructure. You may find the complexity incredibly challenging if your team is new to DNS management or has limited experience with the specific DNS solution you’re using.Increased costs
External DNS services are more expensive than local DNS management. The budget may be acceptable for small deployments, but it can have a significant impact on larger projects with many domains.Latency
External DNS servers may introduce additional latency into your network, as requests for domain name resolution must travel over the network to reach the external server. Latency can have an impact on the performance of your applications and the user experience.Lack of Kubernetes-specific control
While External DNS is a powerful and convenient tool, using it may result in lack of some fine-grained control in certain situations. For example:- Namespace-level control: External DNS automatically creates DNS records for all Services and Ingress resources across all namespaces in your Kubernetes cluster. This can be problematic if you only want to create DNS records for specific namespaces.
- Record type control: External DNS creates only A records by default. If you need to create other types of DNS records (such as CNAME or TXT records), you may need to configure External DNS manually.
- Custom domain configuration: External DNS uses a default domain configuration based on the cluster name and a configurable domain prefix. If you need to use a custom domain name or configure more advanced DNS settings (such as DNSSEC or custom TTL values), you may need to configure External DNS manually.
Best practices in setting up external DNS with Kubernetes
Choose the right DNS provider
Select a DNS provider that meets your reliability, security, and cost needs. Consider factors such as the provider’s level of support for Kubernetes and their track record in handling large-scale deployments.Use DNSSEC for additional security
Enable DNSSEC on your External DNS server to help protect your domain names from tampering and spoofing attacks. It provides an additional layer of security for your Kubernetes applications.Monitor and manage your DNS records
Regularly monitor your DNS records to ensure they are accurate and up-to-date.There are various monitoring tools available that can help you keep track of your DNS records. For example, you can use a tool like Prometheus to monitor the health and performance of your DNS servers, or use a DNS monitoring service like DNSCheck or Pingdom to ensure that your DNS records are accessible and resolving correctly.Test your external DNS setup
Test your External DNS setup thoroughly before deploying it to production. Testing will help ensure that your domain name resolution is working as expected and that you have addressed any potential issues before they affect your users. Following are some of the common testing strategies.- Use nslookup or dig commands to verify that DNS resolution is working correctly for your domain. For example, you can run nslookup mydomain.com to verify that your domain name resolves to the correct IP address.
- Create an Ingress resource that maps to a Kubernetes service, and verify that the DNS records are created correctly. You can do this by checking the Azure DNS management portal or by using nslookup or dig to query the DNS records.
- Use curl or a similar tool to verify that you can connect to your Kubernetes services using your custom domain name. For example, you can run curl https://mydomain.com/api to verify that you can connect to the API service defined in your Ingress resource.
- Simulate a failure of one of your Kubernetes nodes or services, and verify that DNS failover works correctly. For example, you can manually delete a Kubernetes pod or scale down a service, and then check that the Ingress controller updates the DNS records to remove the failed node or service
- When you make changes to your DNS records, it can take some time for the changes to propagate to all DNS servers. Use online DNS tools or wait for some time to verify that your changes have propagated to all DNS servers.
Integrate ingress controllers
Consider using ingress controllers in conjunction with External DNS to manage the distribution of traffic to your application services and improve the performance and reliability of your applications. Following steps provides an outline to do the same using Azure Private DNS:- Create an Azure DNS zone: First, you need to create an Azure DNS zone to host your custom domain name. You can create an Azure DNS zone using the Azure portal or Azure CLI.
- Create a secret for the Azure DNS zone credentials: To allow the Ingress controller to manage DNS records in your Azure DNS zone, you need to create a secret that contains the Azure DNS zone credentials. You can create the secret using the following command:
kubectl create secret generic azure-dns --from-literal=client-id=<CLIENT_ID> --from-literal=client-secret=<CLIENT_SECRET> --from-literal=subscription-id=<SUBSCRIPTION_ID> --from-literal=tenant-id=<TENANT_ID>
Replace <CLIENT_ID>, <CLIENT_SECRET>, <SUBSCRIPTION_ID>, and <TENANT_ID> with your Azure AD application credentials.
- Deploy ExternalDNS using the following manifest file.
					apiVersion: apps/v1
kind: Deployment
metadata:
  name: externaldns
spec:
  selector:
    matchLabels:
      app: externaldns
  strategy:
    type: Recreate
  template:
    metadata:
      labels:
        app: externaldns
    spec:
      containers:
      - name: externaldns
        image: registry.k8s.io/external-dns/external-dns:v0.13.1
        args:
        - --source=service
        - --source=ingress
        - --domain-filter=example.com
        - --provider=azure-private-dns
        - --azure-resource-group=externaldns
        - --azure-subscription-id=<use the id of your subscription>
        volumeMounts:
        - name: azure-config-file
          mountPath: /etc/kubernetes
          readOnly: true
      volumes:
      - name: azure-config-file
        secret:
          secretName: azure-config-file
- Create the deployment for ExternalDNS
kubectl create -f externaldns.yaml
Add redundancy to your setup
Implement redundancy in your External DNS setup to ensure that it remains available even in the event of a failure. For example, you can use multiple DNS servers and failover mechanisms to ensure that your domain name resolution remains functional even in the event of a failure.
Document your setup
Document your External DNS setup and configuration, including the DNS provider and any custom configurations. Documentation makes it easier for others to understand and maintain your setup, so it remains functional over time.
Monitor your costs
Using an external DNS solution for your Kubernetes deployment can incur additional costs that escalate quickly. We recommend you use a tool like Kubecost for overall cost control and management. Kubecost can benefit organisations to monitor their cost in a few ways:
- Visibility: Kubecost helps organisations optimise their Kubernetes spending by identifying areas where they can reduce costs. By providing visibility on resources internally and externally (such as Cloud DNS or network cost), and identifying underutilised resources,
- Resource allocation: Kubecost provides detailed insights into resource usage across Kubernetes clusters, allowing organisations to allocate resources more effectively.
- Performance optimization: By identifying performance bottlenecks and providing insights into resource usage, Kubecost can help organisations ensure that their external DNS is performing optimally and that their Kubernetes infrastructure is capable of handling the demands placed on it.
By following these best practices, you can be assured that your External DNS setup with Kubernetes is reliable, secure, and scalable and provides the best possible experience for your users.
Tutorials steps on using External DNS with Kubernetes
Here are the high-level steps to set up External DNS with Kubernetes:
#1 Install External DNS
External DNS is installed as a Kubernetes add-on using a manifest file. You can find the latest manifest file in the External DNS GitHub repository. External DNS is set up as a pod within your Kubernetes cluster. In this post, we are using a Helm chart built by Bitnami.
#2 Configure External DNS
You need to provide the External DNS with the necessary information to manage your domain names by creating a ConfigMap. You must include information like
- Domain name
- Resource types you want to manage (e.g. Services, Ingress)
- Nameservers for your domain
#3 Create the necessary Kubernetes resources
External DNS needs to know about the resources you want to manage, such as Services and Ingress. To do this, you must create the necessary Kubernetes resources in your cluster.
#4 Verify External DNS is working
You should check that External DNS is working as expected. You can do this by checking the External DNS logs, the External DNS pod status, and the DNS records for your domain.
#5 Maintain External DNS
Once you have set up External DNS, you need to maintain it by tasks like
- Updating the configuration as required
- Checking logs regularly
- Ensuring the External DNS pod is running correctly
External DNS example – Setting up Azure DNS with AKS
Prerequisites before setting up
- An Azure subscription.
- A Domain name (example.com or use a private domain name)
- The Azure CLI is installed on your local machine.
- The kubectl command-line tool is installed on your local machine.
- Helm is Installed.
- Helmfile is installed
Set up your environment variables
Set the following environment variables
					export AZ_LOCATION="westus2"
export AZ_RESOURCE_GROUP="external-dns"
export AZ_DNS_DOMAIN="<your-domain-name>” # CHANGE THIS to your Domain
export AZ_CLUSTER_NAME="external-dns-demo"
export KUBECONFIG=${HOME}/.kube/${AZ_CLUSTER_NAME}.yaml
export AZ_TENANT_ID=$(az account show --query tenantId --output tsv)
export AZ_SUBSCRIPTION_ID=$(az account show --query id --output tsv)
Create Azure resources
Steps to create Azure resources are shown below.
- Create a resource group
az group create --resource-group ${AZ_RESOURCE_GROUP} --location ${AZ_LOCATION}
- Create Azure DNS Zone
az network dns zone create --resource-group ${AZ_RESOURCE_GROUP} --name ${AZ_DNS_DOMAIN}
- Create AKS Cluster
az aks create --name ${AZ_CLUSTER_NAME} --resource-group ${AZ_RESOURCE_GROUP} --vm-set-type VirtualMachineScaleSets --node-vm-size ${AZ_VM_SIZE:-"Standard_DS2_v2"} --load-balancer-sku standard --enable-managed-identity --node-count 3 --zones 1 2 3
- Generate KUBECONFIG file
az aks get-credentials --name ${AZ_CLUSTER_NAME} --resource-group ${AZ_RESOURCE_GROUP} --file ${KUBECONFIG:-"$HOME/.kube/${AZ_CLUSTER_NAME}.yaml"}
- Finally check your DNS zone and the AKS service by using the Azure Portal or the CLI.
Allow Kubernetes to access Azure DNS
The Kubernetes cluster must allow access to the Azure DNS zone via the kubelet identity.
- Obtain the DNS scope
export AZ_DNS_SCOPE=$(az network dns zone list --query "[?name=='$AZ_DNS_DOMAIN'].id" --output table | tail -1)
- Obtain the identity of Kubelet
export AZ_PRINCIPAL_ID=$(az aks show -g $AZ_RESOURCE_GROUP -n $AZ_CLUSTER_NAME --query "identityProfile.kubeletidentity.objectId" --output tsv)
- Add role assignment to allow all pods to update DNS records
az role assignment create --assignee $AZ_PRINCIPAL_ID --role "DNS Zone Contributor" --scope "$AZ_DNS_SCOPE"
- Verify the zone assignment using the Azure portal or using ‘az role assignment list’ command.
Install External DNS
- Use the below template and save it as ‘helmfile.yaml’. Please use the link to check the latest version.
					repositories:
  - name: bitnami
    url: https://charts.bitnami.com/bitnami

releases:
  - name: external-dns
    namespace: kube-addons
    chart: bitnami/external-dns
    version: 5.1.1
    values:
      - provider: azure
        azure:
          resourceGroup: {{ requiredEnv "AZ_RESOURCE_GROUP" }}
          tenantId: {{ requiredEnv "AZ_TENANT_ID" }}
          subscriptionId: {{ requiredEnv "AZ_SUBSCRIPTION_ID" }}
          useManagedIdentityExtension: true
        logLevel: {{ env "EXTERNALDNS_LOG_LEVEL" | default "debug" }}
        domainFilters:
          - {{ requiredEnv "AZ_DNS_DOMAIN" }}
        txtOwnerId: external-dns
- Run the following command
$ helmfile apply
- You have successfully installed and configured external DNS with your Azure Kubernetes Service (AKS). To verify, you can check the logs. If you find any errors in the logs, you know that the setup has failed. The following steps will help you to check the logs for any errors.
					LABEL_NAME="app.kubernetes.io/name=external-dns"
LABEL_INSTANCE="app.kubernetes.io/instance=external-dns"

EXTERNAL_DNS_POD_NAME=$(
 kubectl \
  --namespace kube-addons get pods \
  --selector "$LABEL_NAME,$LABEL_INSTANCE" \
  --output name
)

kubectl logs --namespace kube-addons $EXTERNAL_DNS_POD_NAME
Test External DNS
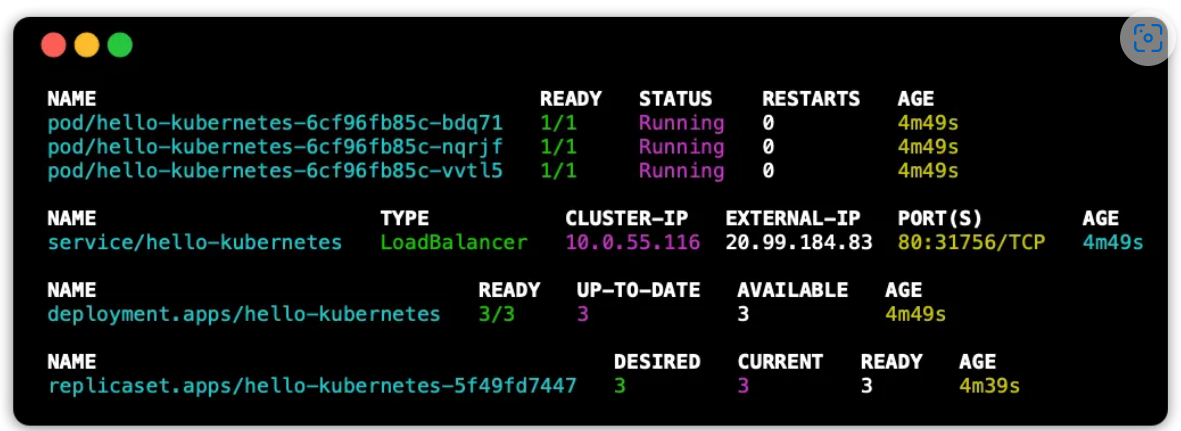
To Test the installation , you can use a simple application like “hello-kubernetes” that prints out the pod names and this will demonstrate that the integration of Azure DNS with External DNS is successful.
- Use the below manifest file and save it as test/helmfile.yaml
					repositories:
  - name: itscontained
    url: https://charts.itscontained.io

releases:
  - name: hello-kubernetes
    namespace: hello
    chart: itscontained/raw
    version: 0.2.5
    values:
      - resources:
          - apiVersion: apps/v1
            kind: Deployment
            metadata:
              name: hello-kubernetes
            spec:
              replicas: 3
              selector:
                matchLabels:
                  app: hello-kubernetes
              template:
                metadata:
                  labels:
                    app: hello-kubernetes
                spec:
                  containers:
                  - name: hello-kubernetes-basic
                    image: paulbouwer/hello-kubernetes:1.10
                    ports:
                      - containerPort: 8080
                    resources:
                      requests:
                        memory: "64Mi"
                        cpu: "80m"
                      limits:
                        memory: "128Mi"
                        cpu: "250m"
                    env:
                      - name: KUBERNETES_NAMESPACE
                        valueFrom:
                          fieldRef:
                            fieldPath: metadata.namespace
                      - name: KUBERNETES_NODE_NAME
                        valueFrom:
                          fieldRef:
                            fieldPath: spec.nodeName

          - apiVersion: v1
            kind: Service
            metadata:
              name: hello-kubernetes
              annotations:
                external-dns.alpha.kubernetes.io/hostname: hello.{{ requiredEnv "AZ_DNS_DOMAIN" }}
            spec:
              type: LoadBalancer
              ports:
              - port: 80
                targetPort: 8080
              selector:
                app: hello-kubernetes
- Deploy the above file using the command
$ helmfile –file test/helmfile.yaml apply
- Check the hello-kubernetes namespace and pods
$ kubectl get all --namespace hello
You should get an output similar to below.
- To verify that the records were created by the externa-dns, run the command below by replacing appropriately the DNS_ ZONE_NAME AND RESOURCE_GROUP_NAME
					$ export AZ_DNS_DOMAIN = <DNS_ZONE_NAME>
$ export AZ_DNS_RESOURCE_GROUP= <DNS_RESOURCE_GROUP_NAME>
$ JMESPATH="[?type=='Microsoft.Network/dnszones/A'] | [].{Name:name,Record:aRecords[0].ipv4Address,TTL:ttl}"

$ az network dns record-set list \
  --resource-group $AZ_DNS_RESOURCE_GROUP \
  --zone-name $AZ_DNS_DOMAIN \
  --output table \
  --query "$JMESPATH"
The output would list that the record is created by external-dns, in this case example.com.

