
![ApptioCareers-Employee[1]](data:image/svg+xml;base64,PHN2ZyB4bWxucz0iaHR0cDovL3d3dy53My5vcmcvMjAwMC9zdmciIHZpZXdCb3g9IjAgMCAyMjUgMjc1IiB3aWR0aD0iMjI1IiBoZWlnaHQ9IjI3NSIgZGF0YS11PSJodHRwcyUzQSUyRiUyRnd3dy5hcHB0aW8uY29tJTJGd3AtY29udGVudCUyRnVwbG9hZHMlMkZlbGVtZW50b3IlMkZ0aHVtYnMlMkZBcHB0aW9DYXJlZXJzLUVtcGxveWVlMS1xZzVuenB5MHdoaWJtbzZvdmJqNGM3MHh0aTUzdmo1OHM0endwajh0dHMucG5nIiBkYXRhLXc9IjIyNSIgZGF0YS1oPSIyNzUiIGRhdGEtYmlwPSIiPjwvc3ZnPg== "ApptioCareers-Employee[1]")
Kubernetes Multi-Cloud
Chapter 4: Federation - Tutorial & Examples
Like this article?
Subscribe to our LinkedIn newsletter to receive more educational content.
Kubernetes has become a universal container orchestration solution for application deployments of all sizes. The features and functionality of Kubernetes have matured to the point that it is now used to manage some of the largest deployment workloads in the world. These workloads can be spread over multiple clusters, data centers, and geographical locations.
However, these multi-cluster designs often include a variety of cloud providers, data centers, regions, and zones where the applications are deployed. Deploying your applications or services on clusters with such diverse capabilities can be quite cumbersome.
This is where Kubernetes Cluster Federation (aka KubeFed) comes in: It lets you manage multiple Kubernetes clusters as if they were one. In this article, we will look at what federation is and how you can use it to manage your multi-cluster Kubernetes deployments.
| Concept | Summary |
|---|---|
| What is Kubernetes Cluster Federation? |
|
| Difference between multi-cluster and federated Kubernetes clusters |
|
| Kubernetes Cluster Federation architecture |
|
| Setting up Kubernetes Cluster Federation |
|
| Cloud solution similar to Kubernetes Cluster Federation |
|

What is Kubernetes Cluster Federation?
Kubernetes Cluster Federation is an essential concept in Kubernetes that enables the loose coupling of multiple independent Kubernetes clusters. Federation allows you to aggregate the resources and services of multiple clusters into a single, logical entity while keeping each cluster isolated and separate. This can be useful in many situations, such as:
- Deploying a global service that needs to span multiple data centers or regions
- Providing a consistent experience for users across multiple disparate clusters
- Aggregating the resources of multiple clusters for reporting or monitoring purposes
Federation enables users to manage a group of Kubernetes clusters as a single entity by replicating and sharing resources across multiple clusters. Kubernetes Cluster Federation provides numerous benefits, including:
- Reduced operational overhead for managing multiple Kubernetes clusters
- Improved application uptime by replicating applications across multiple regions or data centers
- Easy management of multi-cluster deployments with a centralized control plane
- The ability to scale horizontally by adding new regions or data centers without affecting running applications
The difference between multi-cluster and federated Kubernetes clusters
Kubernetes multi-clusters
In computing, a cluster refers to a group of computers connected to work as a single system. A Kubernetes cluster is a group of nodes used to run containerized applications. Kubernetes multi-cluster deployments allow you to distribute the application workload across clusters.
A multi-cluster Kubernetes deployment can be used to achieve several goals, including improved scalability, availability, and resiliency. By spanning multiple clusters, a Kubernetes multi-cluster deployment can provide greater resilience in the face of hardware failures or network outages. A Kubernetes multi-cluster deployment can also offer increased performance and scalability through distributed load balancing across multiple clusters.
Federated Kubernetes clusters
A federated cluster is a multi-cluster deployment in which a central control plane manages a group of child clusters. The child clusters can be located anywhere — on-premises, in different data centers, or with various cloud providers. The federated Kubernetes approach allows administrators to manage all clusters from a single control point.
Federated Kubernetes is best suited for organizations that need to manage a large number of Kubernetes clusters across multiple data centers or regions. This makes it easy to keep your Kubernetes clusters consistent and reduces the time and effort required to manage them.
Setting up Kubernetes Cluster Federation
To demonstrate Kubernetes Cluster Federation, we will use Amazon Elastic Kubernetes Service (EKS) as a Kubernetes cluster.
Deployment Architecture
Here’s what you will deploy to set up Kubernetes Cluster Federation on AWS EKS clusters.

- Host machine (bastion host / local system) to deploy the resources
- EKS clusters in three different AWS regions:
- Host Cluster (
us-east-2) - Federated Cluster 1 (
eu-west-1) - Federated Cluster 2 (
eu-central-1)
- Host Cluster (
Prerequisites
To follow this tutorial, you’ll need:- An AWS account
- awscli (installed and configured with AWS credentials)
- Kubectl
- Helm
- kubefedctl
- Eksctl
- jq
Creating EKS clusters
To set up EKS clusters, create three manifest files:host-cluster.yaml, federated-cluster-1.yaml, and federated-cluster-2.yaml.
					 apiVersion: eksctl.io/v1alpha5
kind: ClusterConfig

metadata:
  name: host-cluster
  region: us-east-2

nodeGroups:
  - name: ng-1
    instanceType: t3.small
    desiredCapacity: 1
    volumeSize: 8
host-cluster.yaml
					 apiVersion: eksctl.io/v1alpha5
kind: ClusterConfig

metadata:
  name: federated-cluster-1
  region: eu-west-1

nodeGroups:
  - name: ng-1
    instanceType: t3.small
    desiredCapacity: 1
    volumeSize: 8
federated-cluster-1.yaml
					 apiVersion: eksctl.io/v1alpha5
kind: ClusterConfig

metadata:
  name: federated-cluster-2
  region: eu-central-1

nodeGroups:
  - name: ng-1
    instanceType: t3.small
    desiredCapacity: 1
    volumeSize: 8
federated-cluster-2.yaml
To apply the configuration, run these commands in your terminal window:
					> eksctl create cluster -f federated-cluster-1.yaml

> eksctl create cluster -f federated-cluster-2.yaml

> eksctl create cluster -f host-cluster.yaml
A quick tip: To speed up the cluster deployments, use multi-tabs/windows on Terminal so that you can deploy all three clusters simultaneously.
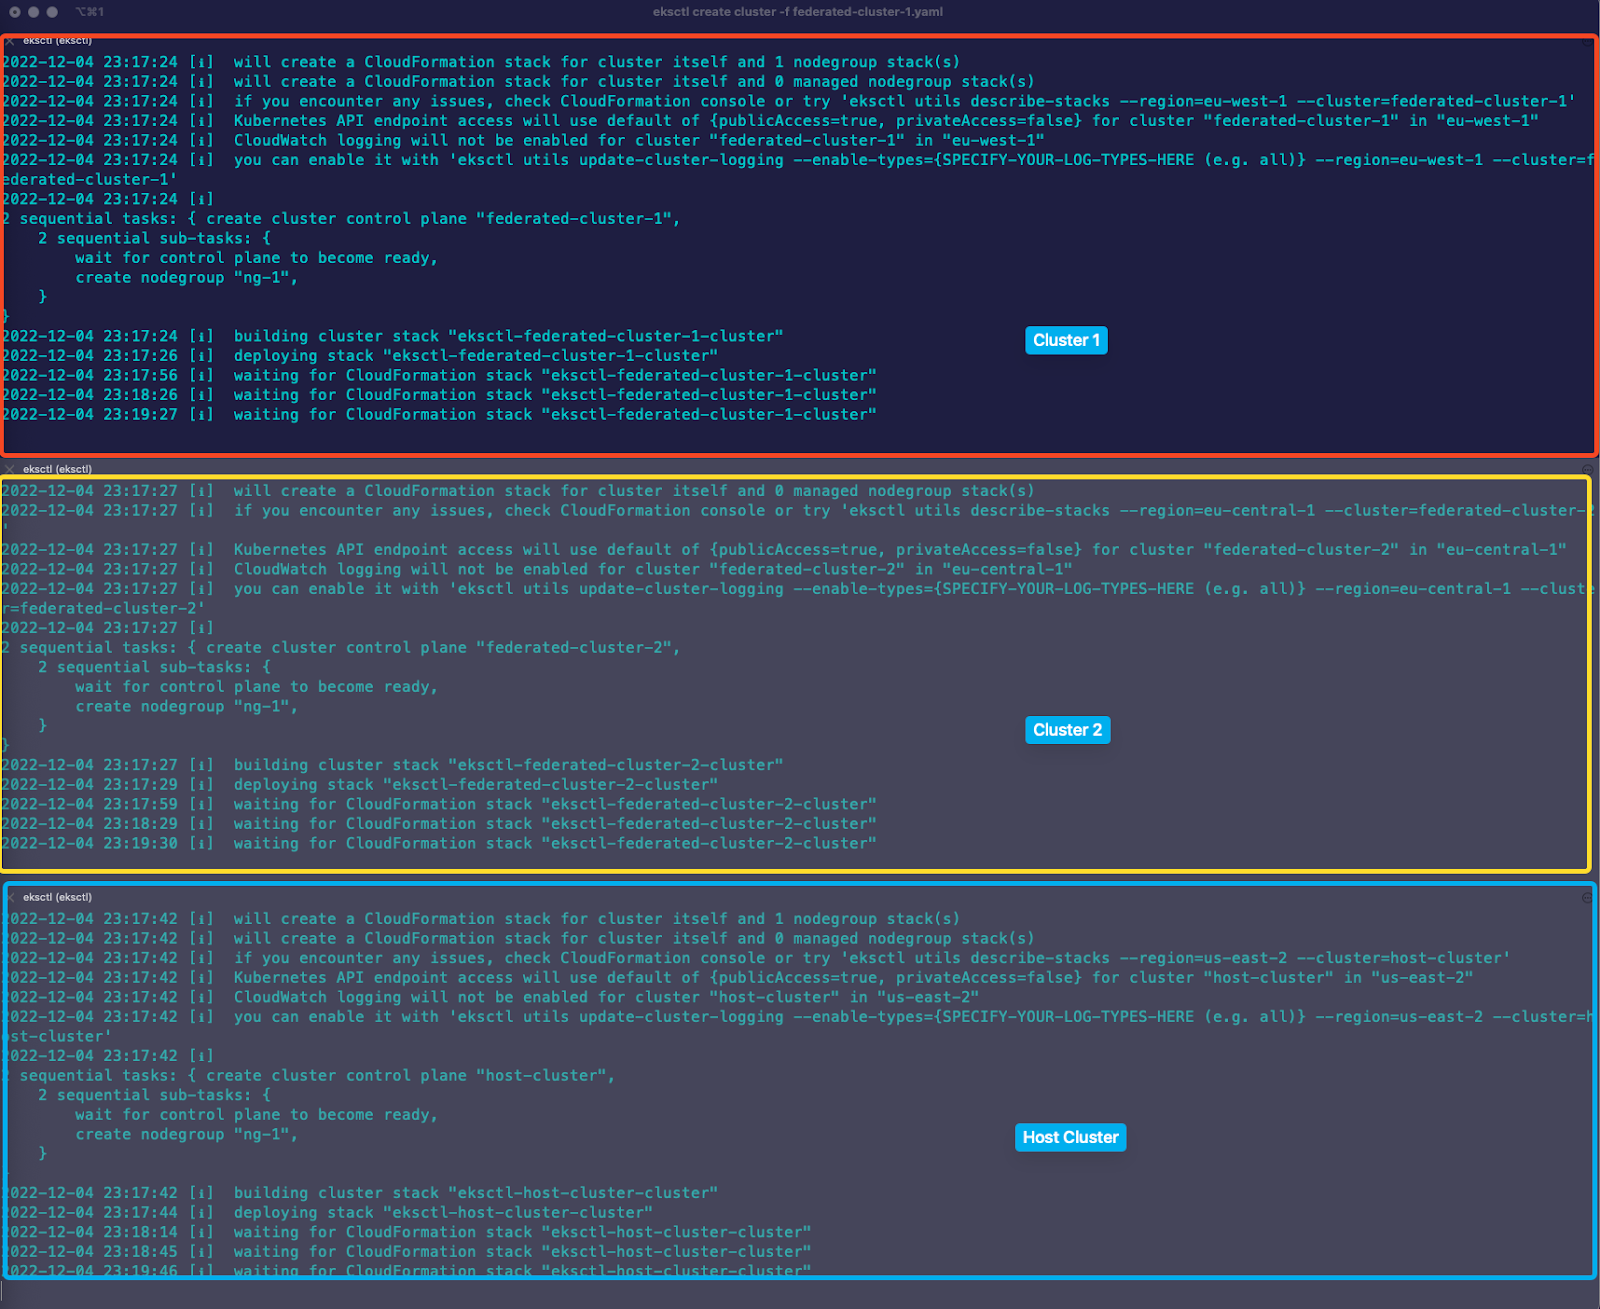
Once the clusters are ready, you should see an output similar to that shown below.
					[✔]  EKS cluster "federated-cluster-1" in "eu-west-1" region is ready

[✔]  EKS cluster "federated-cluster-2" in "eu-central-1" region is ready

[✔]  EKS cluster "host-cluster" in "us-east-2" region is ready
To verify the clusters and get context names, use this command:
					> kubectl config get-contexts --no-headers=true -o name

iamadmin@federated-cluster-1.eu-west-1.eksctl.io
iamadmin@federated-cluster-2.eu-central-1.eksctl.io
iamadmin@host-cluster.us-east-2.eksctl.io
Now, let’s rename cluster context names for better readability.
To rename a context, use the command syntax:
> kubectl config rename-context old-name new-name
					> kubectl config rename-context iamadmin@federated-cluster-1.eu-west-1.eksctl.io federated-cluster-1

> kubectl config rename-context iamadmin@federated-cluster-2.eu-central-1.eksctl.io federated-cluster-2

> kubectl config rename-context iamadmin@host-cluster.us-east-2.eksctl.io host-cluster
Verify new context names:
> kubectl config get-contexts --no-headers=true -o name
Now, we can use these three clusters and interact with them using kubectl. First, we must update the current context to the host cluster’s access. To update the current context, execute this command:
					> kubectl config use-context host-cluster

Switched to context "host-cluster".
KubeFed
KubeFed, short for “Kubernetes Cluster Federation,” is a tool for managing and operating federated Kubernetes clusters. KubeFed provides a command-line interface and a set of Kubernetes manifest files for managing federated clusters. It offers several useful features, such as automatic workload scheduling and management across multiple clusters.
To install kubefed using the helm charts in the host cluster, execute:
					> helm repo add kubefed-charts https://raw.githubusercontent.com/kubernetes-sigs/kubefed/master/charts

> helm repo update
Next, to install a KubeFed chart archive to the cluster, execute:
> helm --namespace kube-federation-system upgrade -i kubefed kubefed-charts/kubefed --create-namespace
The command above will install the KubeFed chart into the kube-federation-system namespace.
To view all the resources added by KubeFed in the host cluster, execute:
> kubectl get all -n kube-federation-system
Registering multiple clusters
While registering multiple clusters under the host cluster, you have the option to include the host cluster as part of the federation. The resources will be deployed on the host cluster and other federated clusters by adding a host cluster as part of the federation.
The example below adds the host cluster as a part of the federated clusters.
Next, you need to add EKS clusters to the host cluster’s federation control plane using kubefedctl.
					> kubefedctl join host-cluster --cluster-context host-cluster --host-cluster-context host-cluster --v=2

> kubefedctl join federated-cluster-1 --cluster-context federated-cluster-1 --host-cluster-context host-cluster --v=2

> kubefedctl join federated-cluster-2 --cluster-context federated-cluster-2 --host-cluster-context host-cluster --v=2
To get all federated clusters, execute:
					> kubectl get kubefedclusters -n kube-federation-system

NAME                  AGE   READY   KUBERNETES-VERSION
federated-cluster-1   68s   True    v1.23.13-eks-fb459a0
federated-cluster-2   60s   True    v1.23.13-eks-fb459a0
host-cluster          77s   True    v1.23.13-eks-fb459a0
Deploying a demo deployment using federated deployment
We will first create a namespace that will be deployed to all the federated clusters. All resources deployed in this specific namespace will be distributed among all federated clusters.
First, you need to create a namespace on the KubeFed host cluster.
					apiVersion: v1
kind: Namespace
metadata:
  name: federated-ns
ns.yaml
To create the namespace, execute:
					> kubectl apply -f ns.yaml

namespace/federated-ns created
You can label each cluster with a standard tag to share resources across all clusters. While deploying federated resources, you can specify this label to distribute the resources among clusters.
					> kubectl label kubefedclusters -n kube-federation-system host-cluster federation-enabled=true

> kubectl label kubefedclusters -n kube-federation-system federated-cluster-1 federation-enabled=true

> kubectl label kubefedclusters -n kube-federation-system federated-cluster-2 federation-enabled=true
namespace resource (in this case, the federated-ns namespace) with other clusters, you need to create a FederatedNamespace object:
					apiVersion: types.kubefed.io/v1beta1
kind: FederatedNamespace
metadata:
  name: federated-ns
  namespace: federated-ns
spec:
  placement:
    clusterSelector:
      matchLabels:
        federation-enabled: "true"
federated-ns.yaml
> kubectl apply -f federated-ns.yaml
namespace from each cluster, execute:
					> for context in $(kubectl config get-contexts --no-headers=true -o name)
do
        echo "Getting namespaces  in context $context"
        kubectl get ns federated-ns --context=$context
done

Getting namespaces  in context federated-cluster-1
NAME           STATUS   AGE
federated-ns   Active   23s
Getting namespaces  in context federated-cluster-2
NAME           STATUS   AGE
federated-ns   Active   23s
Getting namespaces  in context host-cluster
NAME           STATUS   AGE
federated-ns   Active   12m
namespace has been federated, you can begin federating deployments. To test, start with a sample app deployment and a load balancer service:
					apiVersion: types.kubefed.io/v1beta1
kind: FederatedDeployment
metadata:
  name: sample-app
  namespace: federated-ns
spec:
  placement:
    clusterSelector:
      matchLabels: {}
  template:
    spec:
      selector:
        matchLabels:
          app: sample-app
      template:
        metadata:
          labels:
            app: sample-app
        spec:
          containers:
          - image: k8s.gcr.io/echoserver:1.10
            name: sample-app
            ports:
            - containerPort: 8080
              name: http
            - containerPort: 8443
              name: https
federated-deployment.yaml
> kubectl apply -f federated-deployment.yaml
Next, verify federated deployment resource status:
					> kubectl get federateddeployment sample-app -n federated-ns -o json | jq .status.clusters


[
  {
    "name": "federated-cluster-2"
  },
  {
    "name": "host-cluster"
  },
  {
    "name": "federated-cluster-1"
  }
]
The deployment is federated to all the clusters. Now, let’s take a look at the pods:
					> for context in $(kubectl config get-contexts --no-headers=true -o name)
do
        echo "Getting pods  in context $context"
        kubectl get pods -n federated-ns --context=$context
done

Getting pods  in context federated-cluster-1
NAME                         READY   STATUS    RESTARTS   AGE
sample-app-dc484855d-wl5br   1/1     Running   0          7m49s
Getting pods  in context federated-cluster-2
NAME                         READY   STATUS    RESTARTS   AGE
sample-app-dc484855d-4n6g7   1/1     Running   0          7m50s
Getting pods  in context host-cluster
NAME                         READY   STATUS    RESTARTS   AGE
sample-app-dc484855d-g86sk   1/1     Running   0          7m51s
To deploy a load balancer service for deployment, apply a federated service manifest:
					apiVersion: types.kubefed.io/v1beta1
kind: FederatedService
metadata:
  name: sample-app-svc-lb
  namespace: federated-ns
spec:
  placement:
    clusterSelector:
      matchLabels: {}
  template:
    spec:
      ports:
      - name: http
        port: 8080
        protocol: TCP
        targetPort: 8080
      - name: https
        port: 8443
        protocol: TCP
        targetPort: 8443
      selector:
        app: sample-app
      type: LoadBalancer
federated-svc.yaml
					> kubectl apply -f federated-svc.yaml

federatedservice.types.kubefed.io/sample-app-svc-lb created
To verify load balancer service in all the clusters, execute this command:
					> for context in $(kubectl config get-contexts --no-headers=true -o name)
do
  echo "Getting service in context $context"
  kubectl get svc sample-app-svc-lb -n federated-ns --context=$context
done

Getting service in context federated-cluster-1
NAME                TYPE           CLUSTER-IP      EXTERNAL-IP                                                              PORT(S)                         AGE
sample-app-svc-lb   LoadBalancer   10.100.154.92   a8d553a33d1f44da1bdea1feb066fe90-942868406.eu-west-1.elb.amazonaws.com   8080:32027/TCP,8443:31651/TCP   9s

Getting service in context federated-cluster-2
NAME                TYPE           CLUSTER-IP      EXTERNAL-IP                                                                  PORT(S)                         AGE
sample-app-svc-lb   LoadBalancer   10.100.174.82   aea26b82f526e49b6b70697733f4b613-1748865926.eu-central-1.elb.amazonaws.com   8080:31325/TCP,8443:31678/TCP   11s

Getting service in context host-cluster
NAME                TYPE           CLUSTER-IP       EXTERNAL-IP                                                               PORT(S)                         AGE
sample-app-svc-lb   LoadBalancer   10.100.115.143   a78df2cd114fd470dac51f322c2edd5c-1497053958.us-east-2.elb.amazonaws.com   8080:30211/TCP,8443:30215/TCP   11s
You have now successfully federated a namespace, deployment, and service across three Kubernetes clusters.
Cleanup
To delete all the resources created above, execute:
					> kubectl delete -f federated-svc.yaml

> kubectl delete -f federated-deployment.yaml

> kubectl delete -f federated-ns.yaml

> kubectl delete -f ns.yaml

> eksctl delete cluster -f federated-cluster-2.yaml

> eksctl delete cluster -f federated-cluster-1.yaml

> eksctl delete cluster -f host-cluster.yaml
Cloud solution similar to Kubernetes Cluster Federation
Google Cloud Anthos
Anthos is a Google Cloud product that provides a consistently managed Kubernetes experience across multiple environments, so you can run your applications confidently on-premises or in the cloud (Google or otherwise). It also includes a fully managed service mesh with built-in visibility to monitor, trace, and control traffic flowing to and from your services without installing or managing any third-party software.
Anthos also allows you to use the same CI/CD tools and processes across your entire fleet of workloads, regardless of where they’re running. This makes it easy to adopt cloud-native practices if you still need to start using them, and makes it easier for teams to work together across different environments.
With Anthos, you get all these benefits without sacrificing freedom of choice or portability. You can use the Anthos pluggable architecture to swap out critical components with alternatives that better fit your needs. For example, if you want to use a different monitoring solution or container registry, you can do so without rearchitecting your entire application. This lets you take advantage of the best features of each cloud without being locked into any one provider.
Recommended tools for working with federated clusters
Working with federated clusters is a complicated task and requires the right tools to manage them. Here are three tools to easily manage your federated clusters and keep them running efficiently.
Prometheus Thanos
Thanos is an open-source project that helps you achieve higher availability for your metrics data while reducing storage costs through aggressive data retention layout strategies. Thanos runs with your existing Prometheus implementation and ties multiple Prometheus data sets into one long-term storage set.
One of the benefits of using Prometheus is its horizontal scalability, which means it can handle increasing loads simply by adding more machines to the cluster, a process known as “horizontal scaling.” However, this can also create difficulties when storing historical data, as each machine in the cluster will have its own local storage. That’s where Prometheus Thanos comes in, offering a centralized view of all your metrics regardless of how many clusters you’re working with.
Suppose you’re working with multiple federated Kubernetes clusters. In this case, Thanos can help you keep track of all your metrics in one place, and it’s worth considering if you rely heavily on Prometheus for monitoring purposes.
Lens
Lens is a free, open-source Kubernetes IDE that makes it easy to get up and running with Kubernetes. It provides a graphical user interface (GUI) for all of the most common Kubernetes tasks, making it ideal for developers and ops teams who want to get started with Kubernetes without learning the command-line interface (CLI).
The first thing you’ll notice about Lens is its intuitive design: The dashboard view gives you an overview of all the resources in your cluster, and you can easily switch between namespaces using the drop-down menu in the top-left corner. If unsure what a particular resource does, you can hover over it for a tooltip explaining its purpose.
If you’re working with multiple federated Kubernetes clusters, Lens is an essential tool to manage Kubernetes resources efficiently. The dashboard view provides an overview of your cluster’s resources, making it easy to find what you’re looking for; creating and managing resources is straightforward, and debugging applications is a breeze thanks to the GUI, real-time logs, and port forwarding.
Kubecost
Kubecost is a cost management and optimization tool for Kubernetes environments. It provides visibility into the cost of running Kubernetes clusters, including the allocated costs of resources such as pods, deployments, and services. Using Kubecost, you can better understand the costs associated with your Kubernetes deployments and get rightsizing recommendations to optimize costs.
To use Kubecost for cost management, you can install it in your Kubernetes cluster using the Helm chart provided by the project. Once installed, Kubecost will automatically collect and analyze data on the cost of running your cluster and provide you with insights and recommendations through a web-based user interface. You can then use this information to make informed decisions about optimizing your cluster for cost efficiency.
Kubecost is a valuable tool for managing costs within a Kubernetes infrastructure. By collecting data from the Kubernetes API server and identifying various relationships between objects, Kubecost generates an optimized resource utilization model, which can be queried for cost and usage across namespaces, services, pods, nodes, labels, annotations, and more.
Conclusion
Kubernetes Cluster Federation is a powerful concept that enables the loose coupling of multiple independent Kubernetes clusters. Federation allows you to aggregate the resources and services of multiple clusters into a single, logical entity while keeping each cluster isolated and independent.
Many tools are available to help you manage Kubernetes Cluster Federation, including Lens, Kubecost, and Prometheus Thanos. Each tool has unique features and benefits that can be leveraged to manage Kubernetes Cluster Federation efficiently.
When working with federated Kubernetes clusters, it is essential to consider the cost implications of running multiple clusters. Kubecost is a valuable tool for managing costs within a Kubernetes infrastructure.
By understanding the basics of Kubernetes Cluster Federation and leveraging the right tools for the job, you can manage your federated Kubernetes clusters efficiently and effectively.
